EXVAST-GFX User Guide
0. What You Can Do with EXVAST-GFX
Professional Broadcast Graphics. Made Simple.
Broadcast-quality graphics, one click away
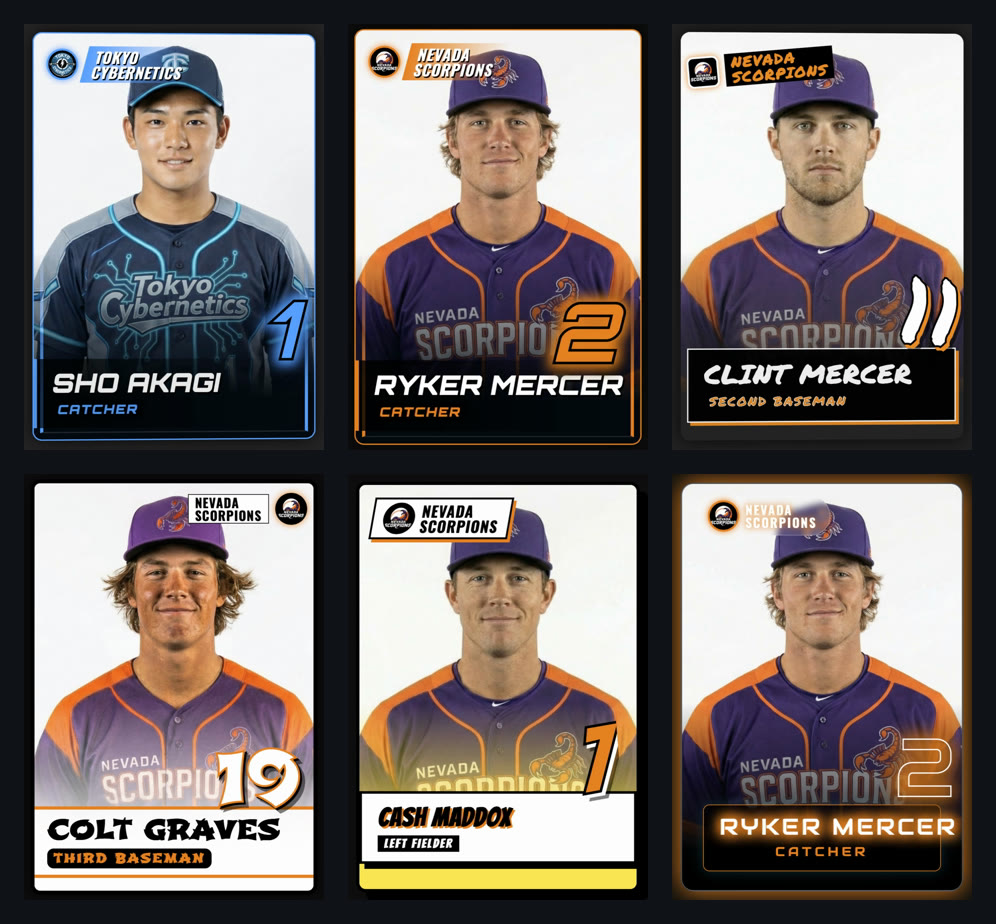
Scoreboards and game clocks for Baseball and Football (Soccer), player intros, starting lineups and goal scorers. Each graphic goes on and off air with a single click. Just pick a theme, and everything animates in like a network broadcast.
Player intro cards come in 10 different designs.
→ More: 2. Quick Start / 3. Controller
Stream live
Go live with your graphics on YouTube, Twitch, Facebook or any other RTMP service.
→ More: 2-4. Stream / 4-4. RTMP Stream / 5-3. Streaming settings
Record to MP4
Record your program, graphics and all, as an MP4 file.
→ More: 2-3. Record / 4-2. Recording
Add graphics to footage you've already shot
Shot the game on a camcorder or phone? Add the graphics afterward and get a finished MP4. No editing software required.
- Play your footage in Media Controller using Full (Back) (behind the graphics)
- Follow along and fire the scoreboard and player intros from the Controller
- Record in Output Manager
Prefer to finish in an editor? Export just the graphics with a transparent background (ProRes 4444 MOV / PNG) and drop them over your footage in Premiere Pro or DaVinci Resolve.
→ More: 9-1. Add graphics to your footage and export an MP4 / 9-2. Overlay graphics in an editing app
Works with the software and gear you already use
Send EXVAST-GFX graphics straight into your existing streaming software and production equipment.
| Method | Destination | Key point |
|---|---|---|
| EX-LINK | OBS, vMix, web browsers | Just open a URL — even on another computer on the same network. In OBS or vMix, add it as a browser source |
| NDI® | OBS, vMix and more | Send graphics with transparency over your network |
| SDI Fill & Key | Blackmagic switchers | The same Fill and Key workflow broadcasters use, via a Blackmagic DeckLink or UltraStudio |
→ More: 9-3. EX-LINK / 9-4. NDI® / 9-5. SDI Fill & Key
Two outputs, two layouts
Keep two independent layouts, Output 1 and Output 2. Scores and player names stay in sync; only the placement changes. For example, feed OBS with Output 1 over EX-LINK and your switcher with Output 2 over SDI Fill & Key.
→ More: 10-2. Output 1 / Output 2
Customize layouts and shortcuts
- Layout Editor: Drag the scoreboard, player intros and other graphics to reposition and resize them.
- Keyboard Shortcuts: Map any key to any button. Pair it with a controller like a Stream Deck to take graphics on and off air or start recording and streaming with one press. A red marker highlights the exact button you're mapping, so there's no guesswork.
→ More: 10-1. Layout Editor / 10-3. Keyboard Shortcuts
Features by plan
1. Getting Started
1-1. System requirements
- Mac: A Mac with Apple silicon (M1 or later). Intel-based Macs are not supported.
- OS: macOS 14 Sonoma or later (tested on macOS 26 Tahoe)
- Windows support is coming soon. We will announce it on www.exvast.live when it is ready.
Screenshots in this guide are from the Mac version. On Windows, use Ctrl wherever you see ⌘.
1-2. Installation
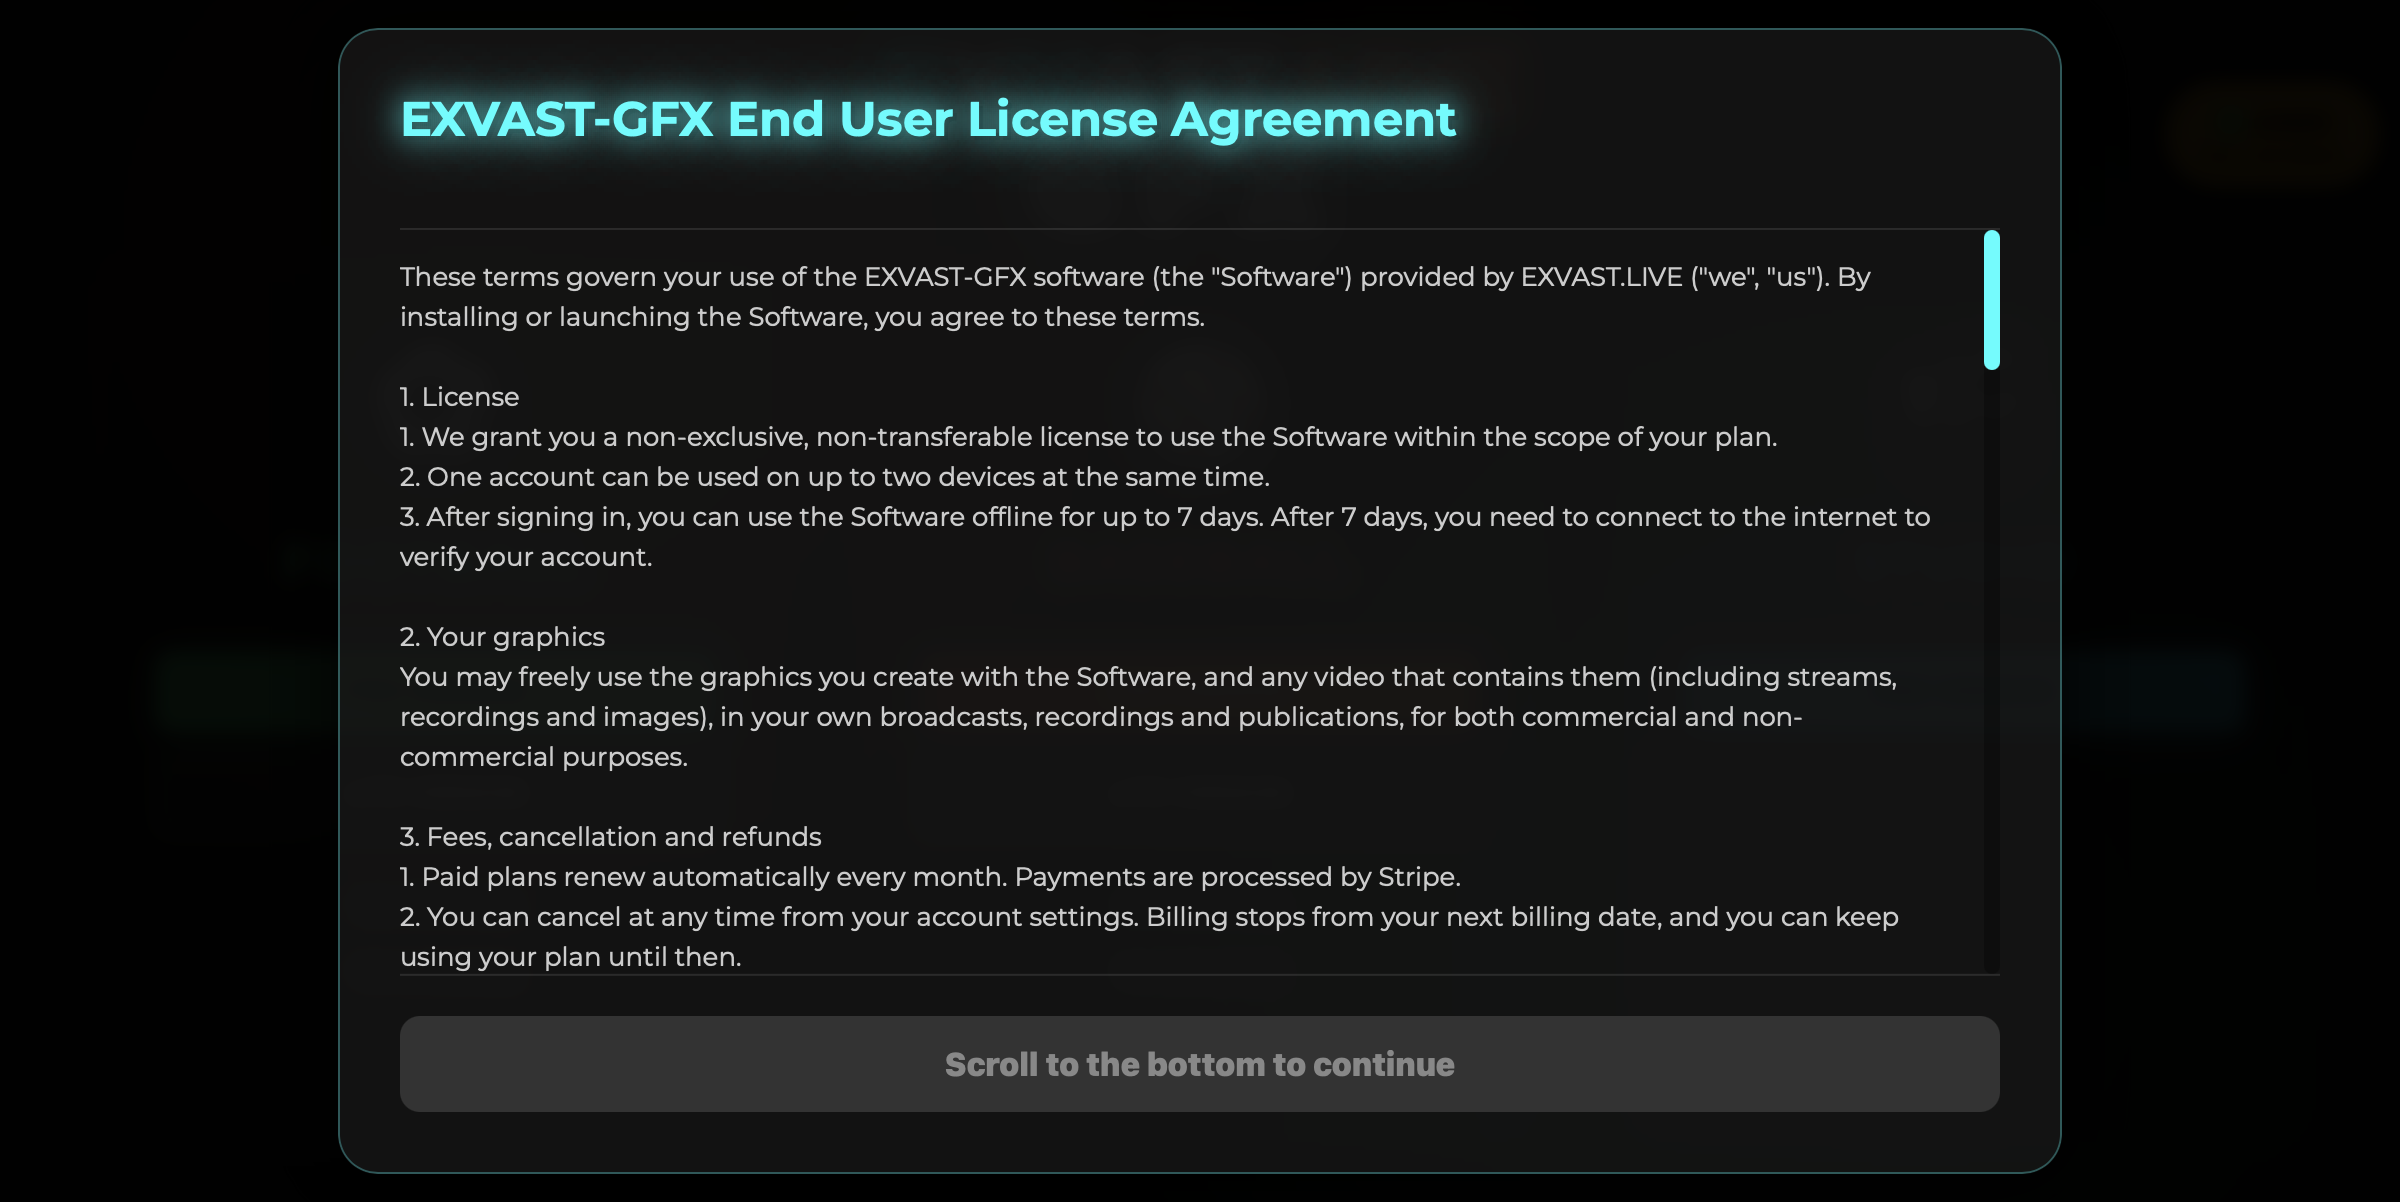
Download the app from the download page and install it. The first time you open it, you'll see the license agreement. Scroll to the bottom to enable Agree & Continue, then click it. If the agreement is updated, you'll be asked to accept it again the next time you open the app.
Update notifications: When a new version is available, you'll be notified at launch. Click Download to go to the download page, then download the new version and replace the app. Click Later to skip that version (important updates will keep reminding you).
Third-party software licenses: Licenses for the third-party software included in EXVAST-GFX are listed at Third-Party Licenses. The same notices are also included inside the app (Exvast-GFX.app/Contents/Resources/third_party_notices).
1-3. The Launcher (first screen)
The Launcher opens first. This is where you choose your sport and plan.
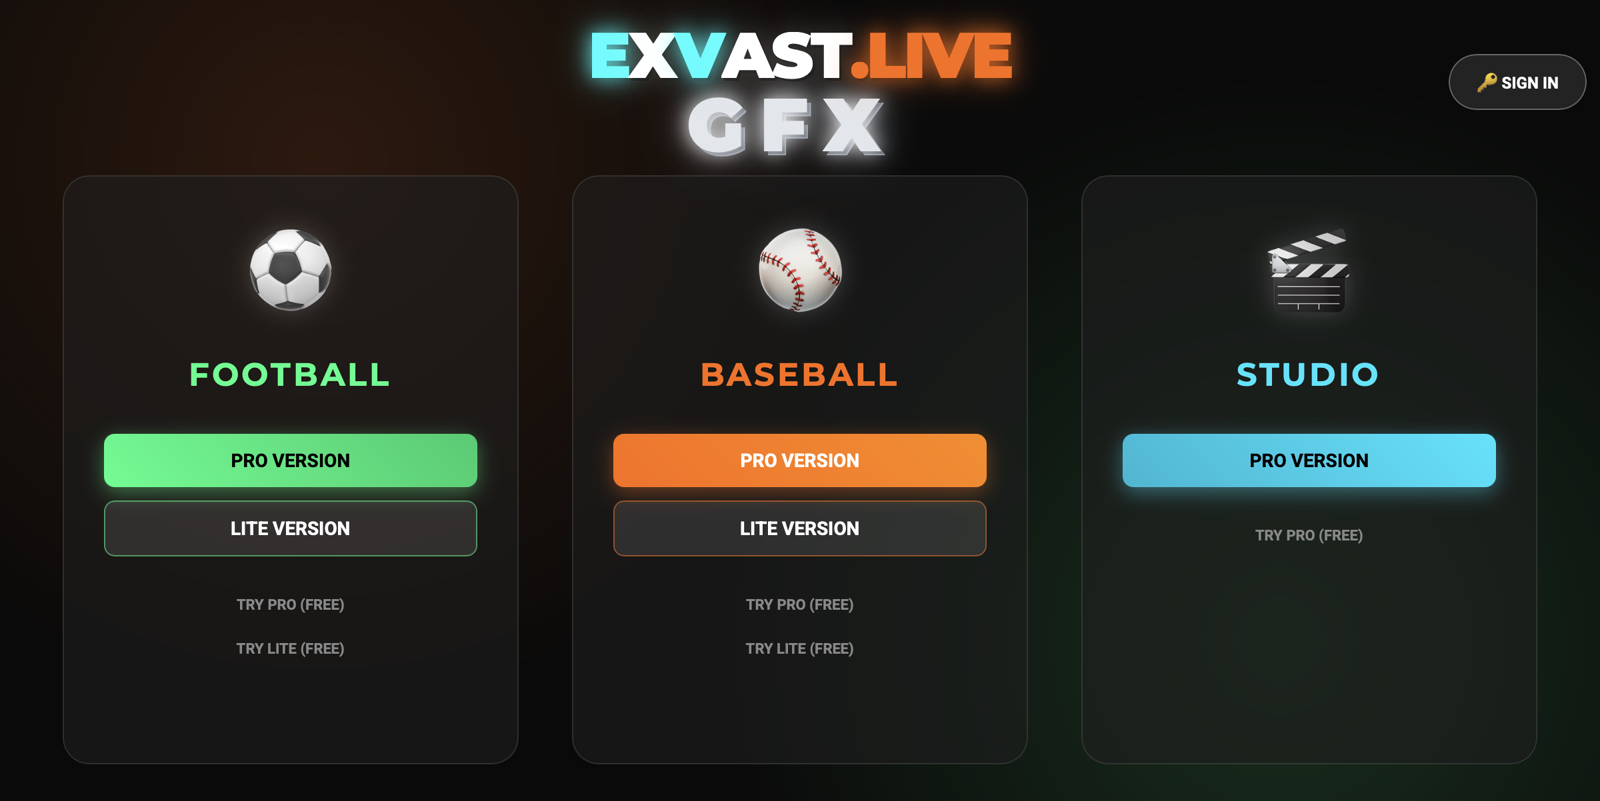
| Button | What it does |
|---|---|
| PRO Version | Starts with the PRO plan |
| LITE Version | Starts with the LITE plan |
| Try PRO (Free) / Try LITE (Free) | Starts the free trial (see 1-6) |
| PRO Version under Studio | Launches a sport-independent mode that uses only PSD, video and sponsor graphics |
1-4. Sign in and buy a plan
- Click Sign In at the top right of the Launcher. The EXVAST website opens in your browser.
- Sign in with your Google or Apple account.
- You're returned to the app automatically. Your name (or email address) appears at the top right, with your plan (such as PRO) underneath.
When you're offline, this button turns **orange** (you can keep working on your previous sign-in).
- Purchase a plan under Plans & Pricing at www.exvast.live, where you'll also find current pricing.
- To cancel, change your card, or download receipts and invoices, sign in at www.exvast.live and click Billing & Receipts at the top. To download a receipt or invoice, click a row under Invoice history on the page that opens.
Good to know
- Each account can be signed in on up to 2 computers. Signing in on a third signs out the one with the oldest sign-in.
- After signing in, you can work offline for up to 7 days. After that, connect to the internet once to continue.
1-5. Plan comparison
| Feature | LITE | PRO | STUDIO |
|---|---|---|---|
| Scoreboard and game clock | ✓ | ✓ | − |
| Team colors and logos, design themes | ✓ | ✓ | − |
| Player names, player intros and starting lineups | − | ✓ | − |
| Graphics with player photos and videos | − | ✓ | − |
| Commentator names | − | ✓ | − |
| Graphics with your own PSD designs | − | ✓ | ✓ |
| Import player lists and data from Excel or Google Sheets | − | ✓ | ✓ |
| Sponsor display | − | ✓ | ✓ |
| Overlay videos and images on graphics (Media Controller) | − | ✓ | ✓ |
| Streaming (RTMP) and recording (MP4) | ✓ | ✓ | ✓ |
| Recording with a transparent background (MOV / PNG) | ✓ | ✓ | ✓ |
| EX-LINK and chroma key | ✓ | ✓ | ✓ |
| NDI® and SDI Fill & Key | − | ✓ | ✓ |
| Studio mode | − | ✓ | ✓ |
- PRO includes every feature of LITE and STUDIO.
- See www.exvast.live for prices.
1-6. Free trial limits
Try PRO (Free) / Try LITE (Free) let you try everything without signing in, with these limits:
- Output includes a watermark.
- Recording stops automatically after 10 minutes, and streaming after 5 minutes.
- The watermark becomes more prominent 30 minutes after launch.
2. Quick Start — Your First Recording in 5 Minutes
2-1. Launch
In the Launcher, click PRO Version under Football (Soccer) or Baseball. Three windows open:
| Window | Role |
|---|---|
| Controller | Runs your graphics: team names, scores, show/hide buttons and more |
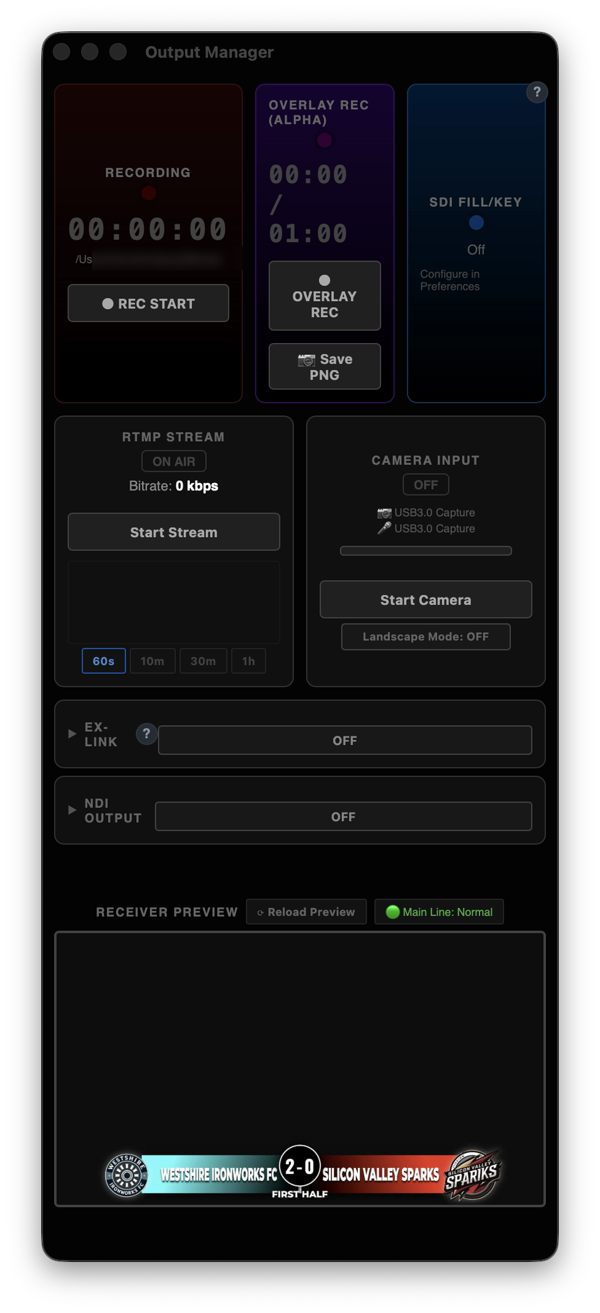
| Output Manager | Monitors your program output and controls recording, streaming and outputs |
| Receiver | Displays the graphics. With an external display connected, it runs full screen there |
Allow Screen Recording (first launch only) The first time you launch a sport, macOS asks for Screen Recording permission. Turn on Exvast-GFX, then reopen the app. Without it, the preview, recordings and streams will be black.
👉 Open Screen Recording settings (System Settings → Privacy & Security → Screen & System Audio Recording)

2-2. Set up the teams and show the scoreboard
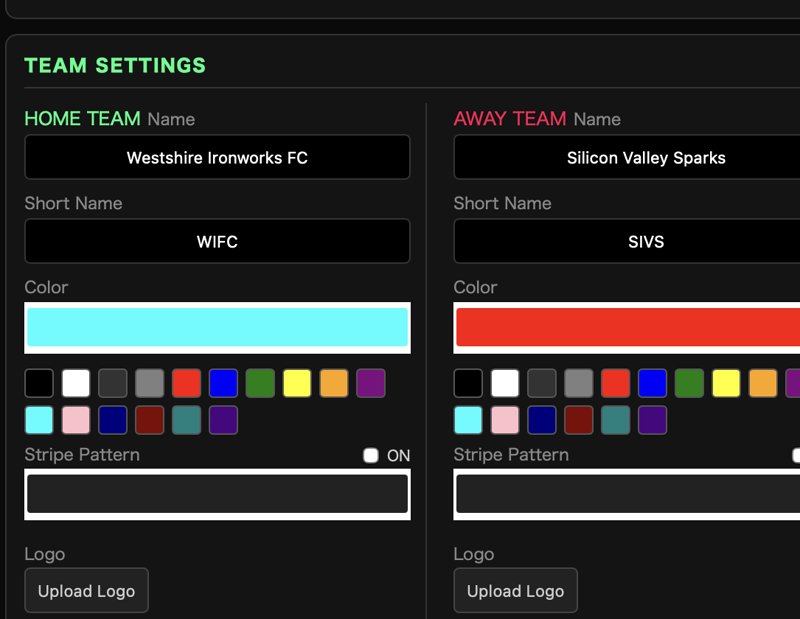
- In the Controller, enter the home and away team names, colors and logos.
- Click the button that shows the scoreboard.
- Football (Soccer): Show Scorebug
- Baseball: Show / Hide (instant) or Show / Fade (fade in)
- The scoreboard appears in the Receiver Preview in Output Manager.
2-3. Record
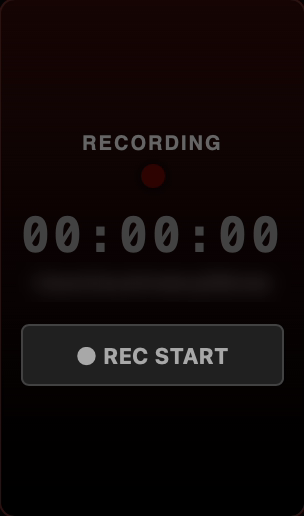
- In Output Manager, click ● REC START under Recording. Click it again to stop.
- Recordings go to your Movies folder by default (Videos on Windows). You can change this under Recording in Preferences.
2-4. Stream
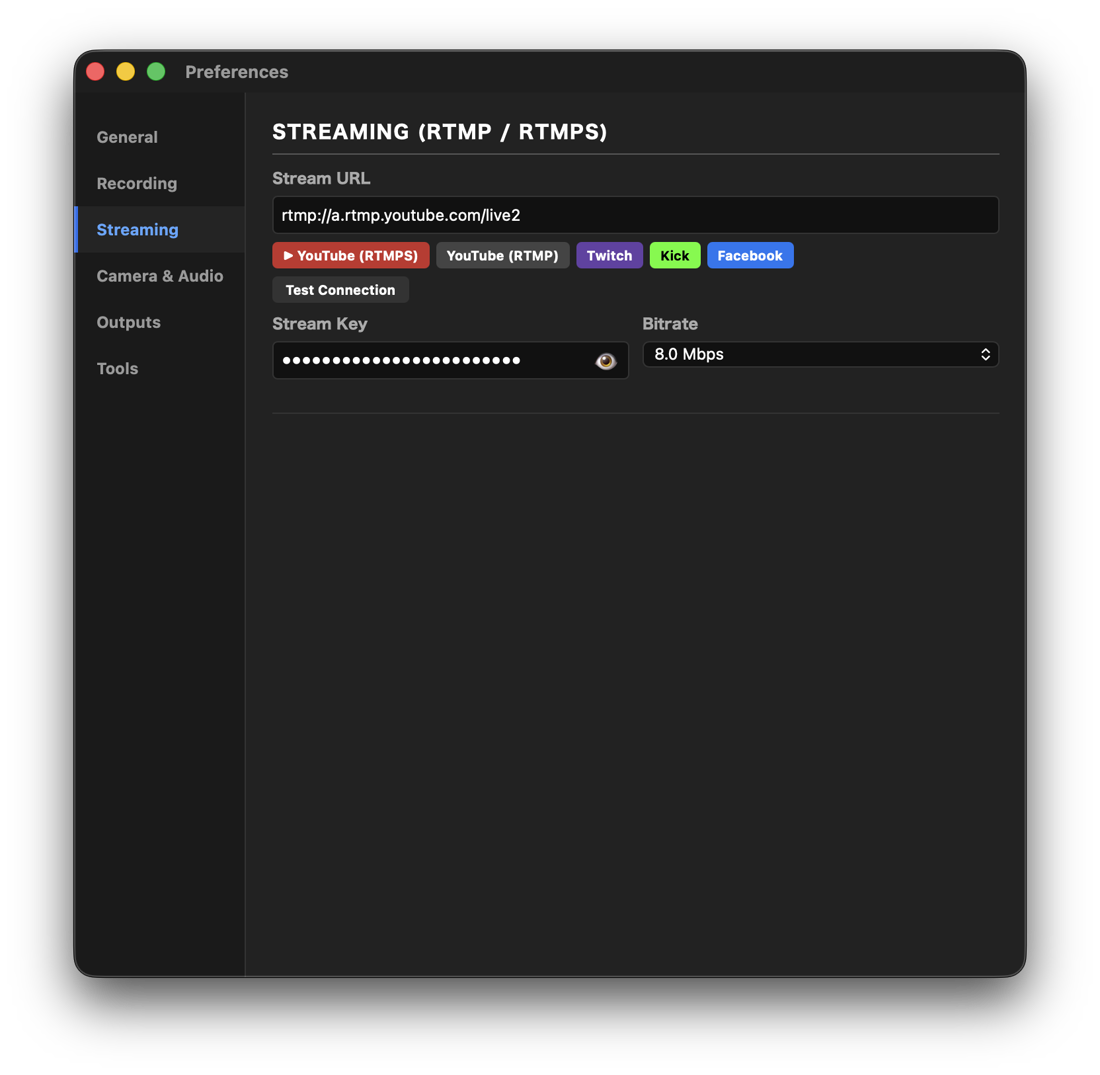
- Open Preferences from the menu and select the Streaming tab.
- Choose where to stream (for example YouTube (RTMPS)) and enter the Stream Key from your streaming service.
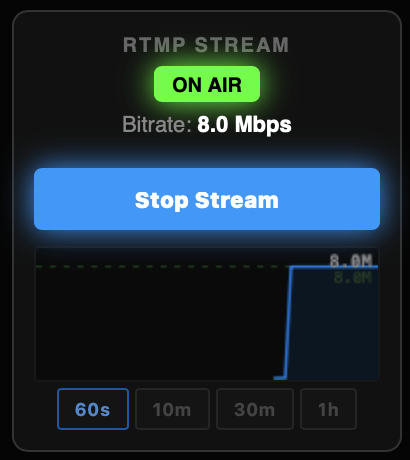
- Click Start Stream under RTMP Stream in Output Manager, and you're live.
2-5. Bring in a camera
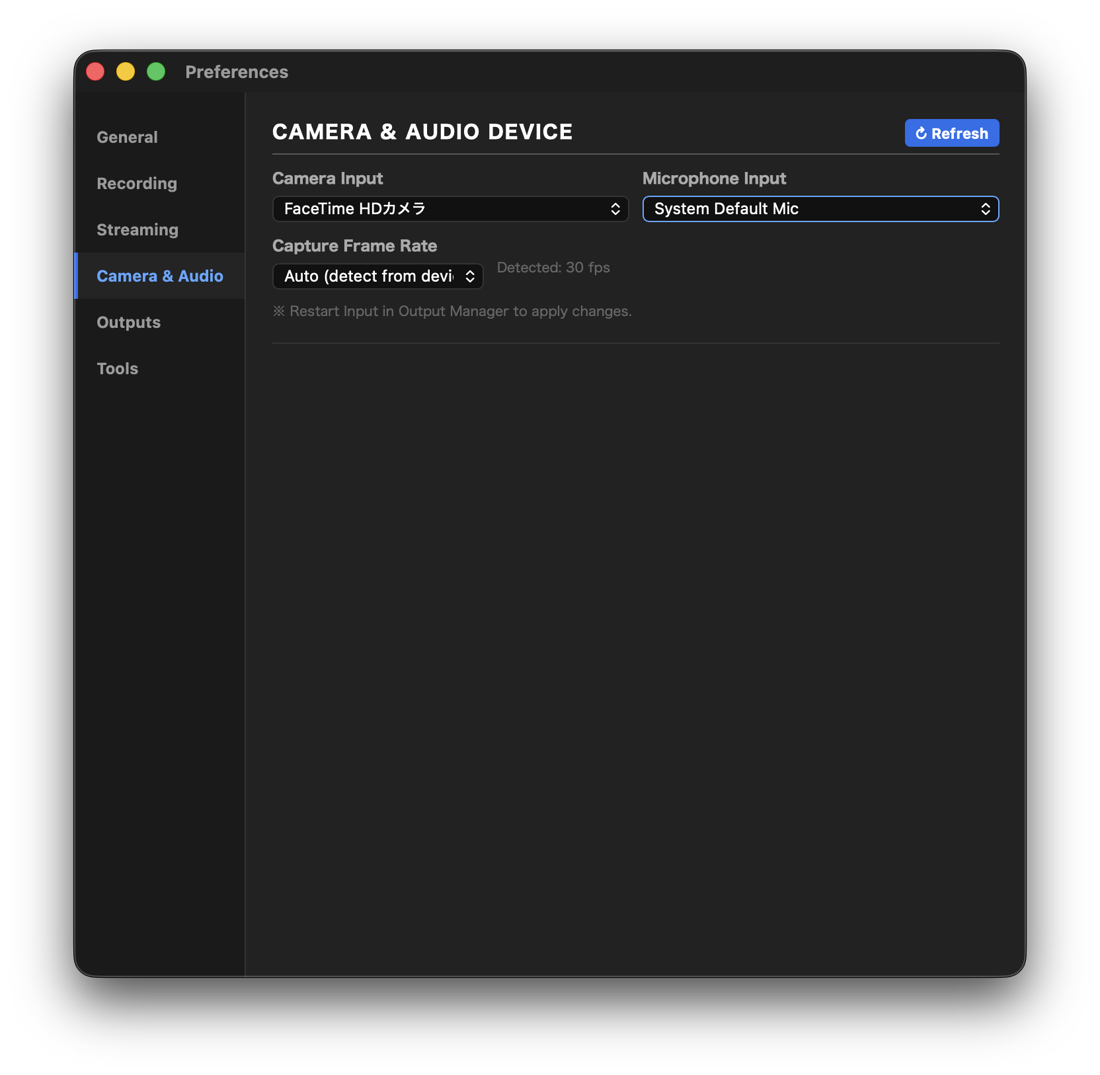
- On the Camera & Audio tab in Preferences, choose your camera and microphone.
- Click Start Camera under Camera Input in Output Manager.
The first time you use a camera, macOS asks for camera and microphone access. Allow Exvast-GFX. To change this later:
👉 Open Camera settings / Open Microphone settings
2-6. Save all your settings (Save Project)
- File → Save Project (⌘S) in the menu saves all your current settings to a single .exv file. To load one, use Open Project... (⌘O).
- Teams, players, graphic positions, sponsors, Media Controller, Table Overlay and Preferences settings are all stored in one file.
- You can choose whether to include your Stream Key when saving. Leave it out if you're sharing the file.
- It works in Studio too. In Studio, the Stream Key is never included.
- Keep one file per game or tournament, and next time, setup is as simple as opening it.
3. Controller (Operating the Graphics)
You'll use the Controller throughout the game. The left side handles game controls; the right side handles players and presentation (PRO only).
On the LITE plan, the right side (players and presentation) and sections marked PRO (Data, Team Mapping) are not shown.
3-1. Football (Soccer) Controller
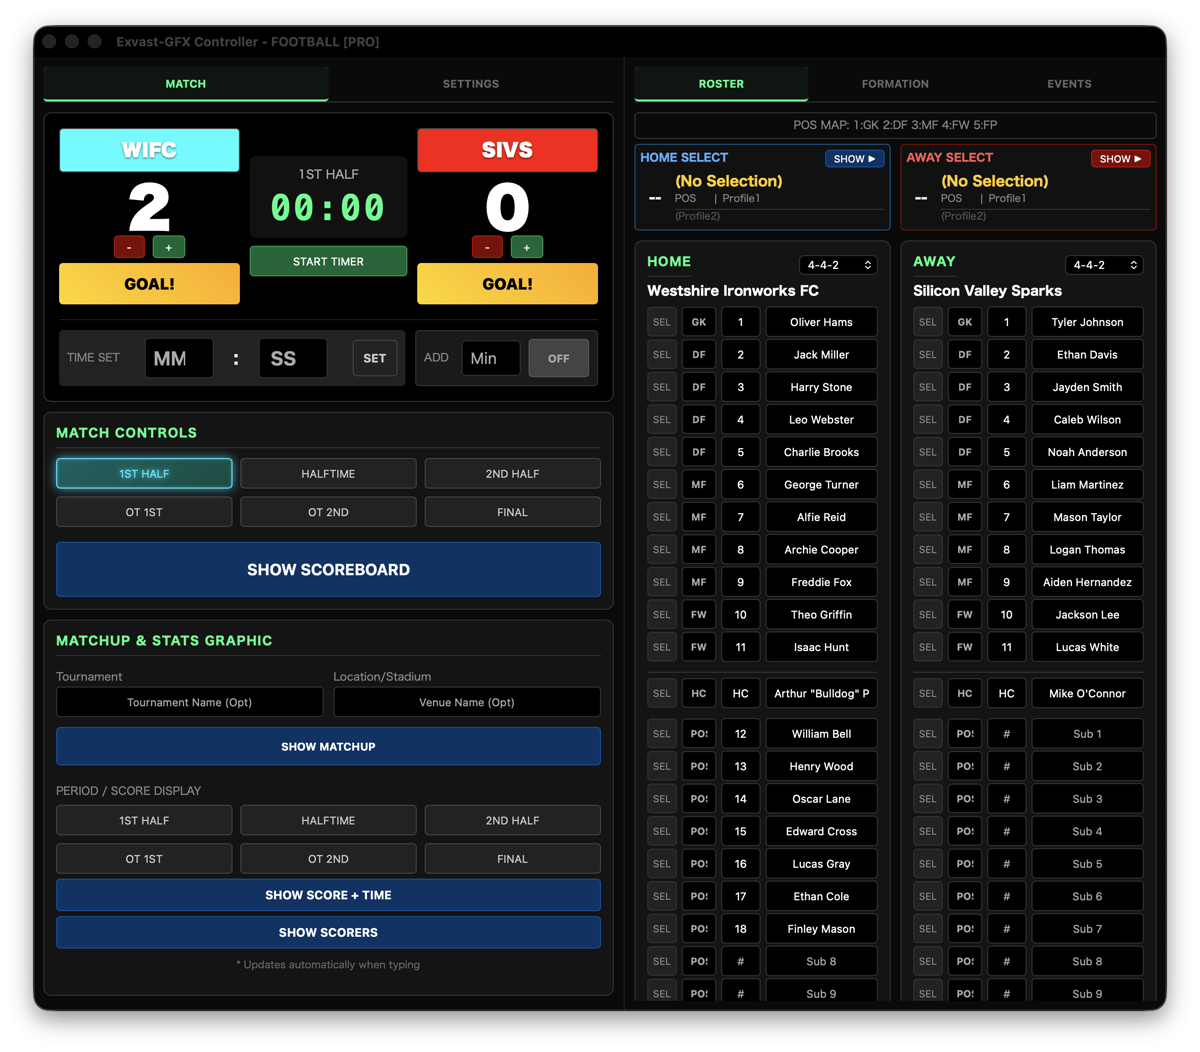
With English (UK) selected, some labels are different. For example, ROSTER becomes LINEUP, Final becomes Full Time, OT 1st becomes ET 1st, and Bench becomes Substitutes.
MATCH tab (during the game)
Score and timer (top)
| Button | What it does |
|---|---|
| GOAL! | Adds a goal and plays the goal animation. The time of the goal is logged automatically in the GOAL LOG |
| + / − | Corrects the score only (no animation). − also removes the last entry in the GOAL LOG |
| START TIMER | Starts the game clock. Click again to stop it |
| TIME SET | Enter minutes (MM) and seconds (SS) and click SET to set the clock |
| Add | Enter stoppage time (minutes) and show it with OFF / ON |
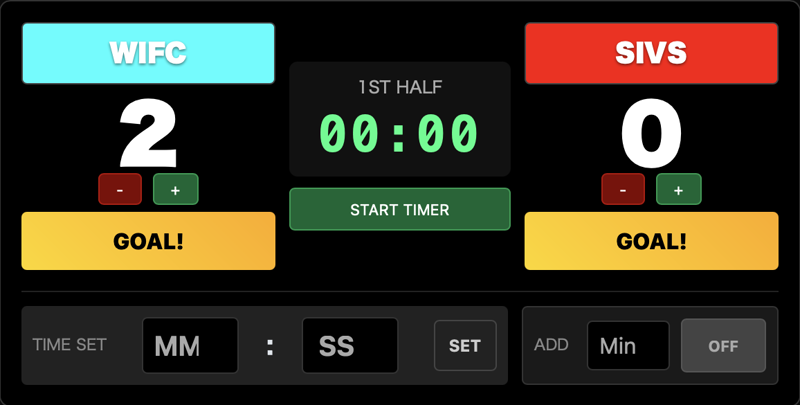
Match Controls
- 1st Half / Halftime / 2nd Half / OT 1st / OT 2nd / Final: Sets the current period.
- SHOW SCOREBUG: Shows or hides the scoreboard at the top of the screen.
MATCHUP & STATS GRAPHIC
- Tournament / Location/Stadium: Enter the tournament name and venue.
- SHOW MATCHUP: Shows a large matchup graphic.
- Period / Score Display: Shows a large period-and-score graphic at halftime or full time.
- SHOW SCORE + TIME: Shows the score and time.
- SHOW SCORERS: Shows the list of goal scorers. If a player scores more than once, the times are listed after the name (e.g.
Player Name 10' 40').
PENALTY SHOOTOUT
- KICK ORDER: Switches which team kicks first.
- SHOW PK GRAPHIC: Shows the penalty shootout graphic. RESET clears the record.
Data (PRO)
- Imports player data from Excel or Google Sheets. See 6. Importing from Excel and Google Sheets.
SETTINGS tab (before the game)
| Section | What you set |
|---|---|
| TEAM SETTINGS | For home and away: team name (Name), abbreviation (Short Name), color (Color), stripes (Stripe Pattern) and logo (Upload Logo) |
| MATCH CONFIG | Length of each half (HALF LENGTH) and of extra time (ET LENGTH), in minutes |
| DESIGN THEME | The look of your graphics |
| DANGER ZONE | ALL RESET clears all scores, the timer and names (you will be asked to confirm) |
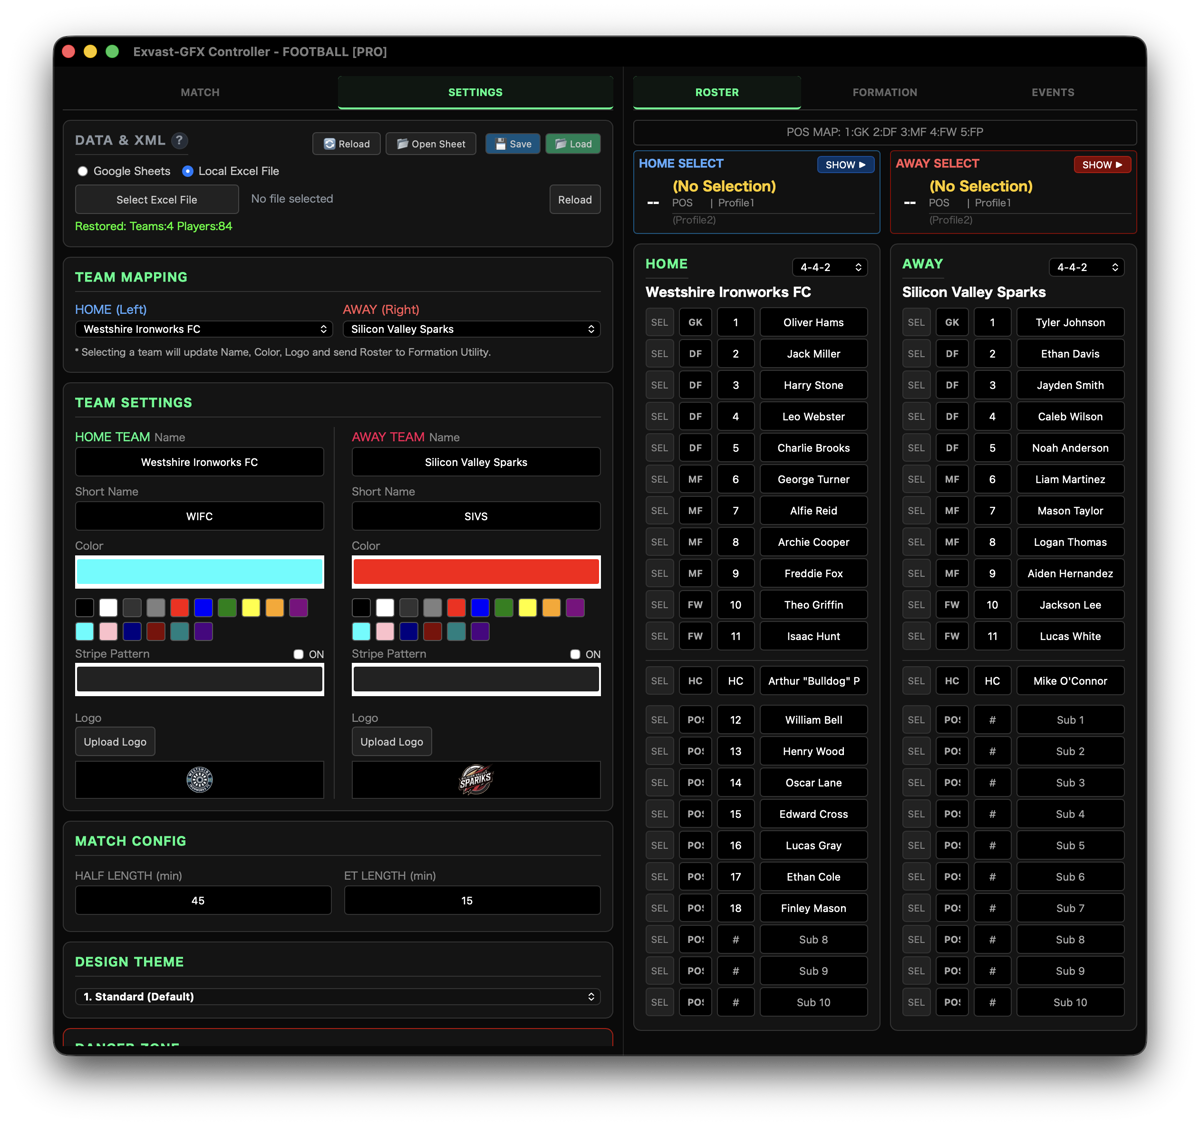
Right side (PRO): ROSTER / FORMATION / EVENTS
| Tab | What you can do |
|---|---|
| ROSTER | Enter home and away players (number, name, position) and show a player card with SHOW ▶ |
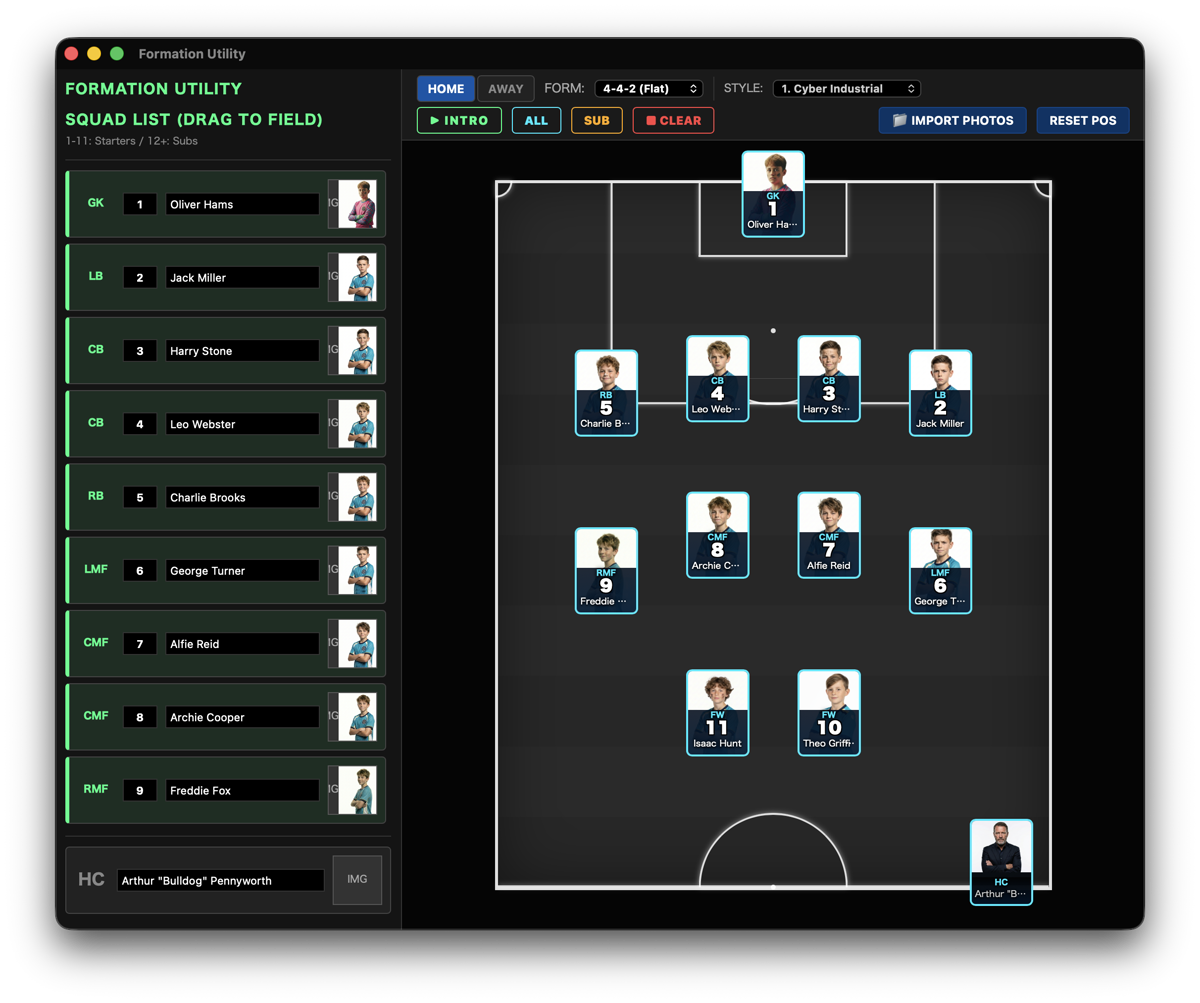
| FORMATION | Show off the squad with animated STARTERS and BENCH graphics under SQUAD SHOWCASE. OPEN FORMATION opens the Formation Utility |
| EVENTS | 🎙 COMMENTARY (commentator names, ON AIR / OFF), GOAL LOG (goal scorers), SUBSTITUTION, CARDS (yellow / red) and TEAM STATS |
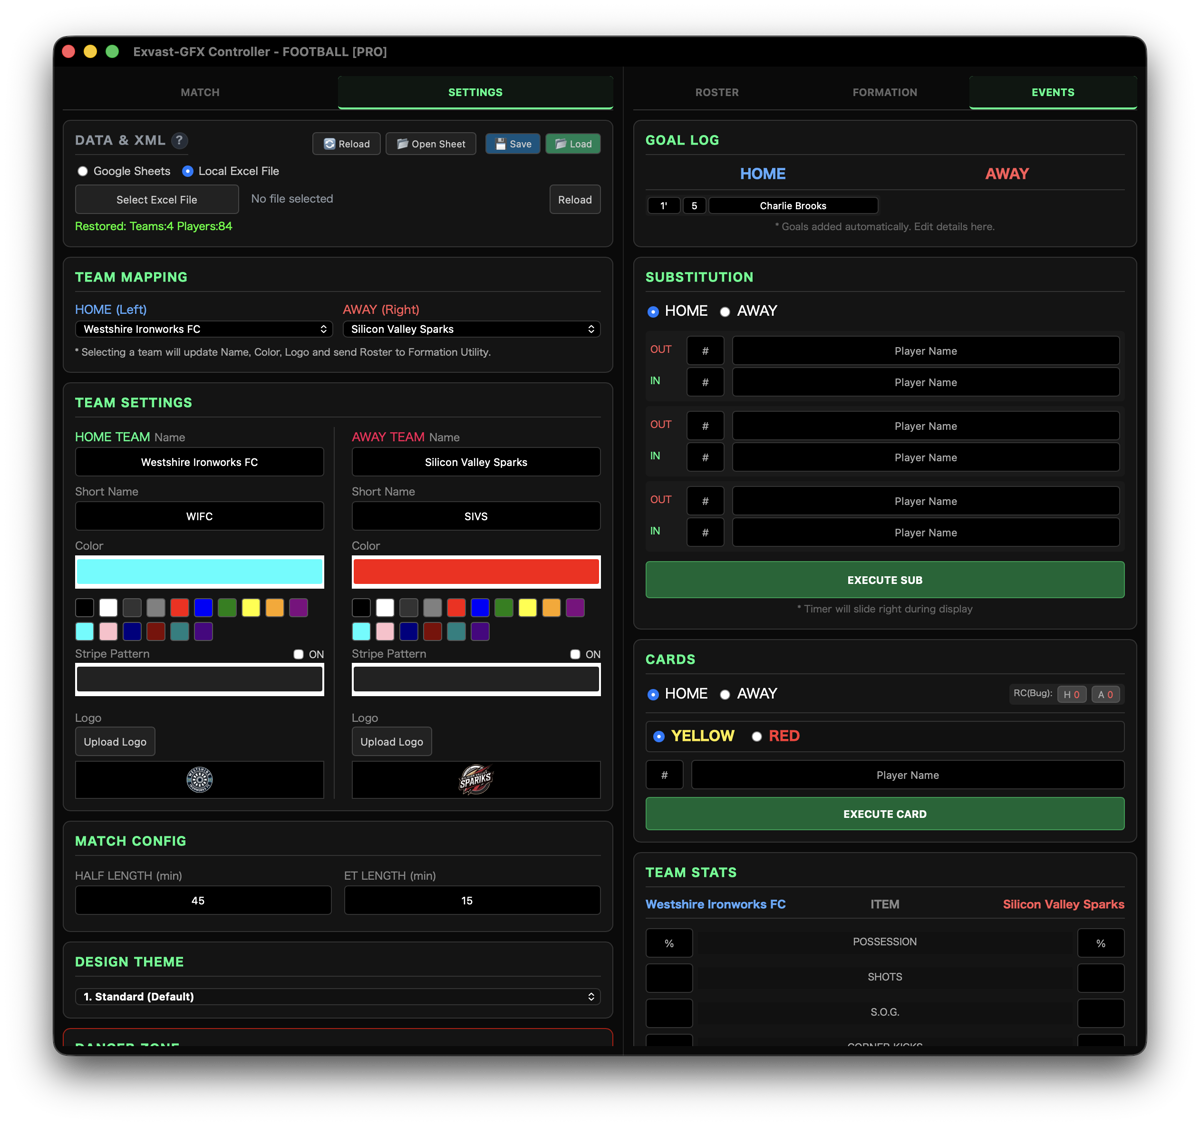
Using the GOAL LOG: Each GOAL! adds a row stamped with the time of the goal. Enter the shirt number, and the player's name is filled in from the ROSTER.
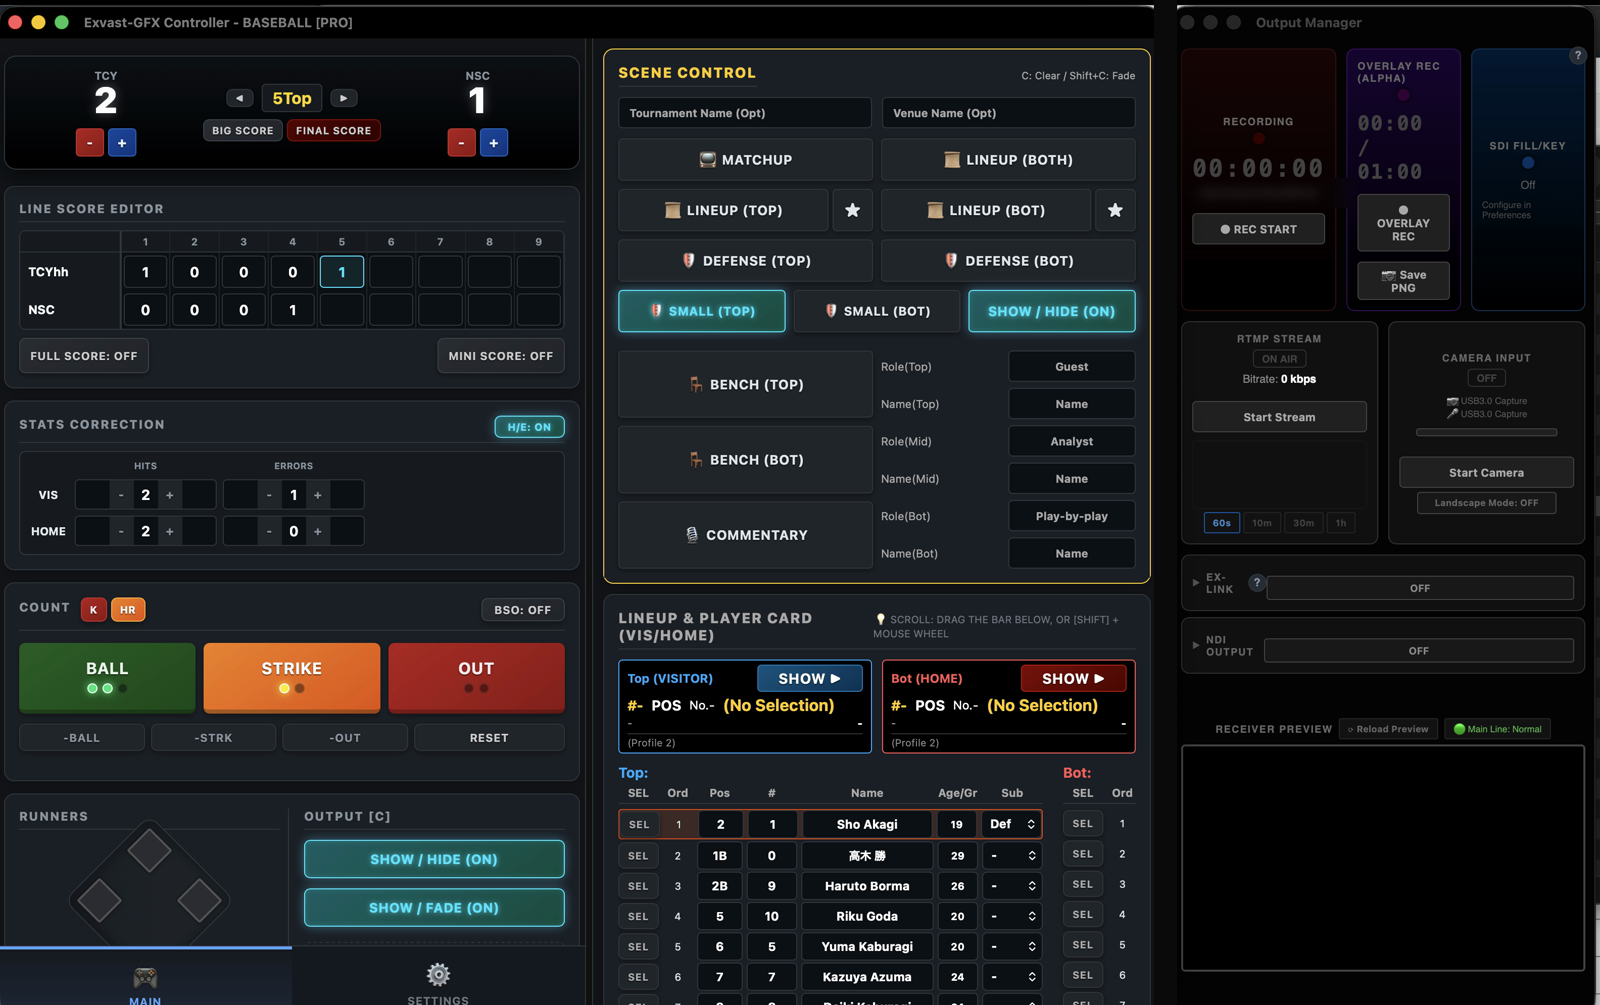
3-2. Baseball Controller
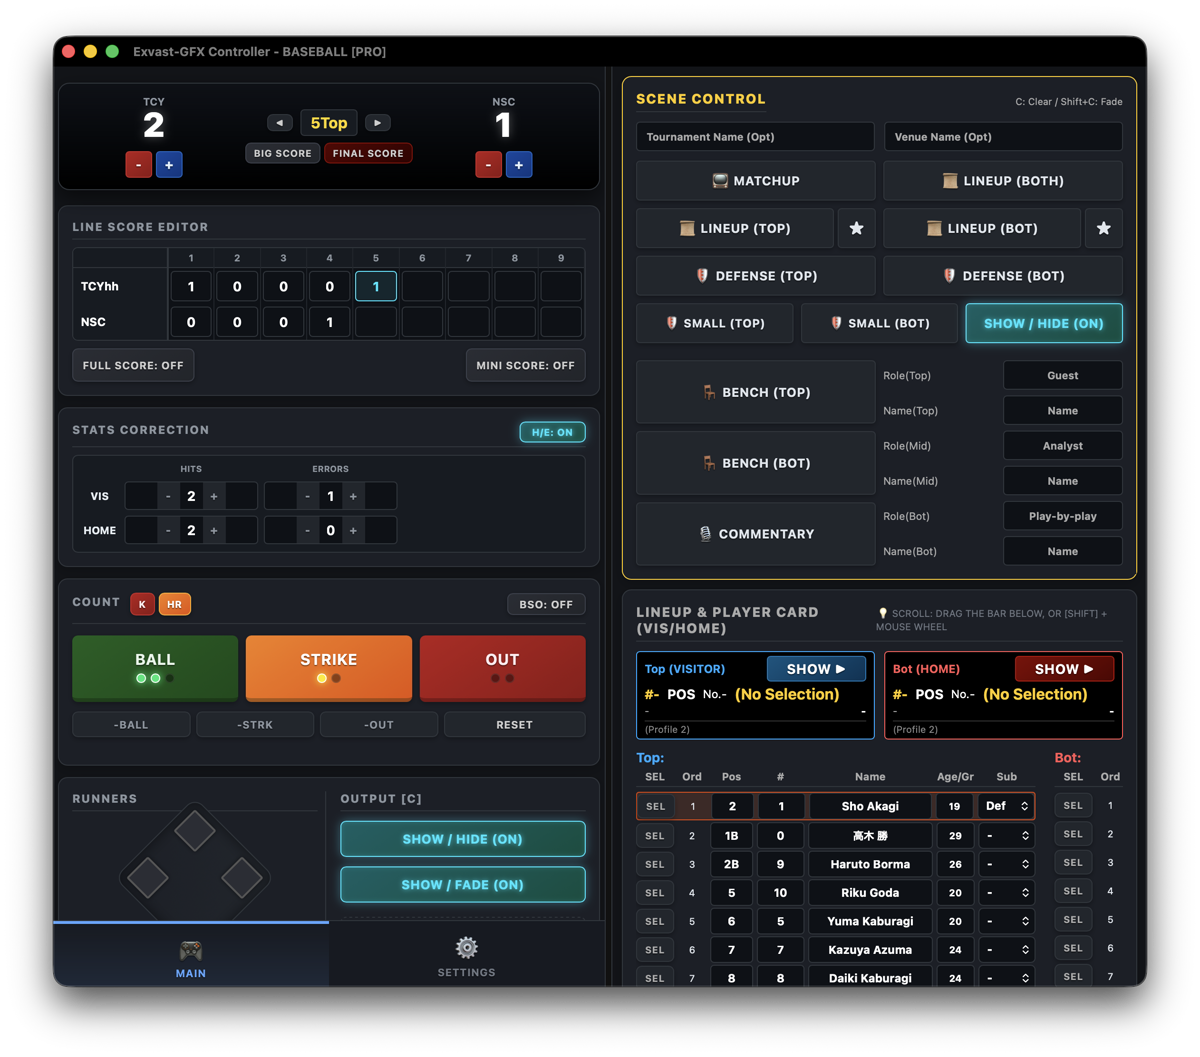
MAIN tab (during the game)
Score and inning (top)
- + / −: Changes each team's score.
- ◀ / ▶: Moves the inning (top / bottom) forward or back.
- Big Score: Shows the score in large type. Final Score: Shows the final score.
Count
- BALL / STRIKE / OUT: Adds one to the count. -Ball / -Strk / -Out takes one away, and RESET clears the count.
- K triggers the strikeout animation, and HR the home run animation.
- BSO: Toggles the count display.
- START / STOP / RESET: Controls the pitch clock.
Runners
- Click a base to put a runner on. Reset Runners clears the bases.
Output [C]
- Show / Hide: Shows or hides the scoreboard instantly.
- Show / Fade: Fades the scoreboard in or out.
Line Score Editor
- Full Score: Shows the inning-by-inning line score. Mini Score: Shows a compact line score.
Stats Correction
- Correct each team's hits (HITS), errors (ERRORS) and pitch count (PITCH) with + / −. × resets the pitch count to 0.
- H/E toggles the hits and errors display.
System
- ⚠ RESET ALL: Returns the score, inning and count to their starting state (you will be asked to confirm; team settings are kept).
SETTINGS tab (before the game)
| Section | What you set |
|---|---|
| Team Config | Visitor and home team names, abbreviations and logos (Logo...) |
| Game Rules | Number of regulation innings (9 by default) |
| Clock Settings | Pitch clock seconds (bases empty / runners on) |
| Display Toggles | Show Pitch Count, Show Clock, Swap Matchup Sides (flip the matchup so the home team is on the left), BSO Style (count style: numbers or lights) and Design Theme (4 types, Type A–D) |
| Screen Position | Scoreboard position (top left, top center, top right, bottom left, bottom center, bottom right) |
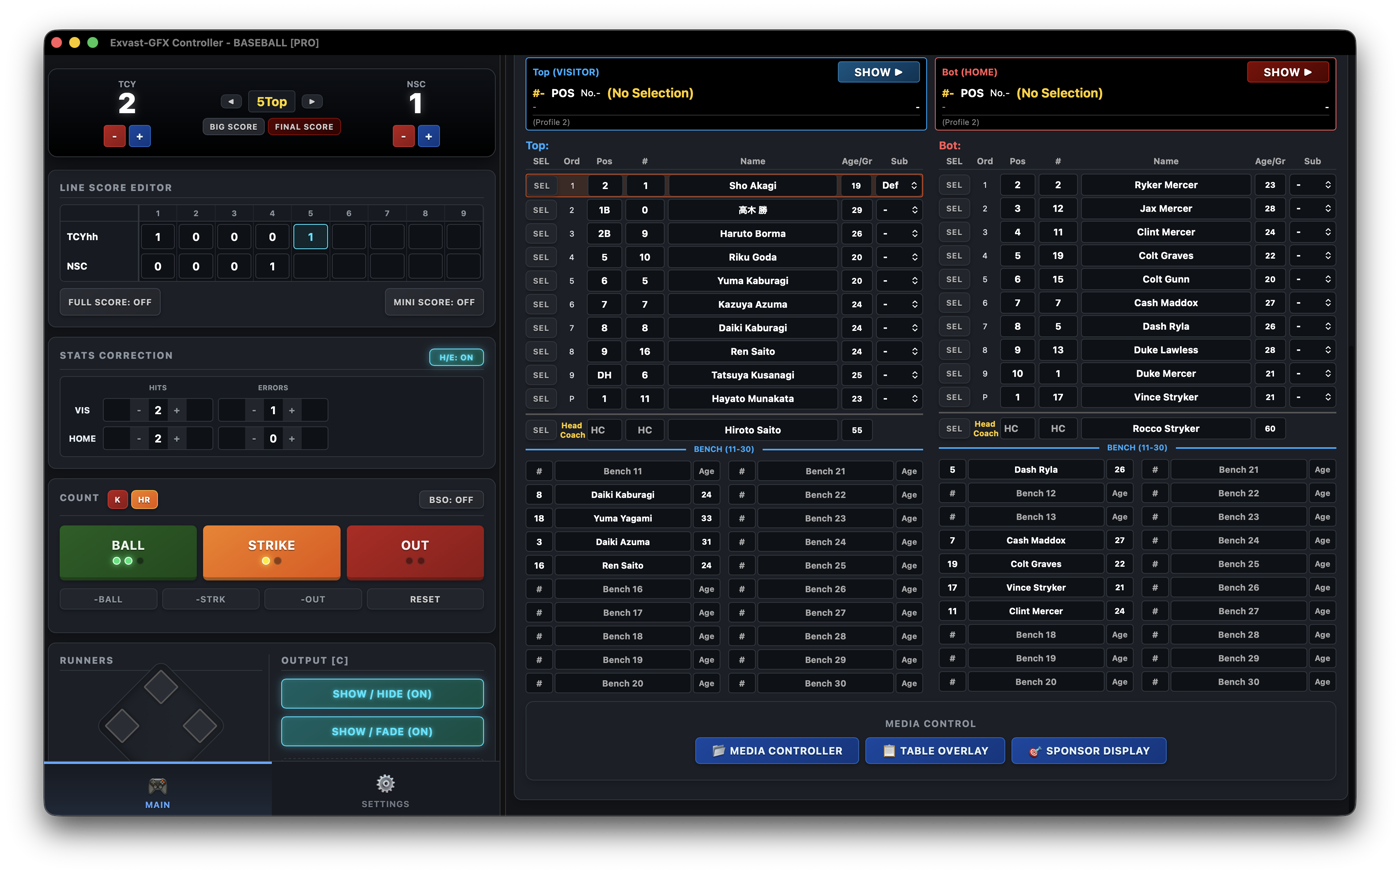
Right side (PRO): Scene Control and Lineup & Player Card
| Section | What you can do |
|---|---|
| Scene Control | Shows 📺 Matchup, 📜 Lineup (both teams / visitor / home), 🛡 Defense (fielding positions), 🪑 Bench and 🎙 Comm. (commentators). ★ opens the player intro screen (Intro Controller) |
| Lineup & Player Card | Enter the batting order and players for both teams, and show a player card with SHOW ▶ |
| MEDIA CONTROL | Opens 📂 Media Controller, 📋 Table Overlay (PSD) and 🎯 Sponsor Display |
4. Output Manager (Recording, Streaming and Outputs)
Output Manager is where you monitor your program and control recording, streaming and every output to other software and hardware.
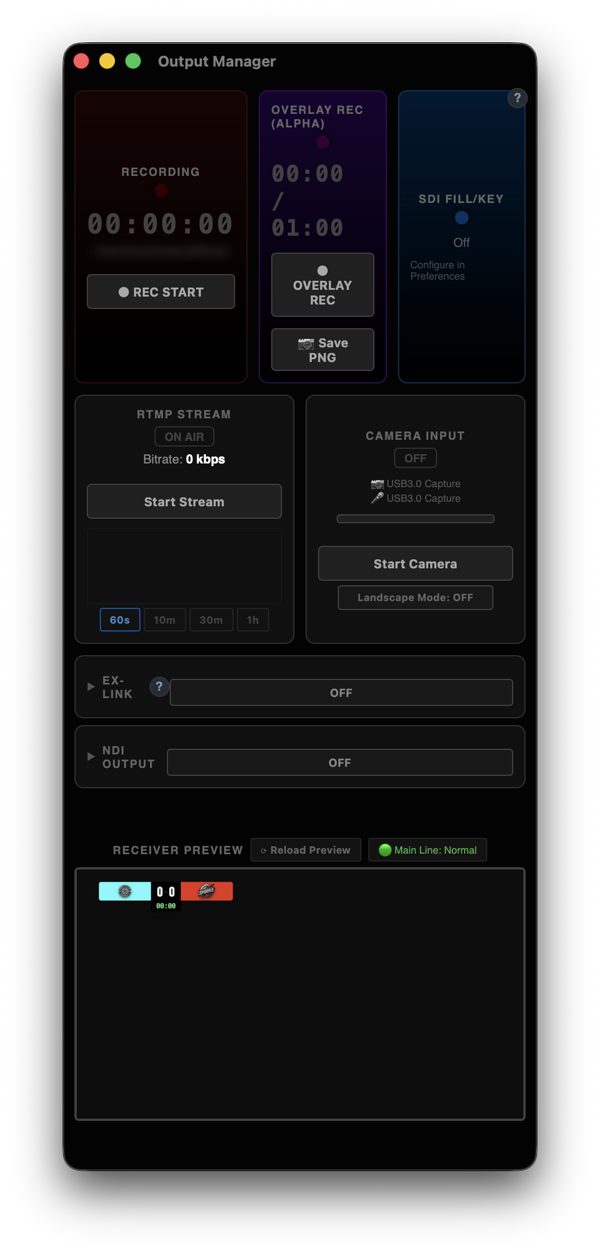
4-1. Receiver Preview
Shows exactly what is being recorded and streamed, graphics included.
- If the picture freezes or goes black, click ⟳ Reload Preview to reconnect. Recording and streaming are not interrupted.
4-2. Recording
- Click ● REC START to record the video with graphics as an MP4. Click again to stop.
- Recordings are saved to your Movies folder by default (the Videos folder on Windows). You can change this under Recording in Preferences.
- Recording won't start if less than 5 GB is free at the save location, so a recording never cuts out partway through.
- You can record while streaming. Each is encoded separately — the recording at your Recording quality and the stream at your Streaming quality — so you can lower the stream bitrate and still keep a pristine recording.
4-3. Overlay Rec (Alpha) — record only the graphics, with transparency
- ● OVERLAY REC: Records only the graphics with a transparent background (ProRes 4444 MOV), ready to layer over footage in Premiere Pro or DaVinci Resolve.
- 📷 Save PNG: Saves the graphics currently on air as a transparent PNG.
- These files are very large, so recording stops automatically after a set time. Choose the length with Max Duration (auto-stop) under Recording in Preferences (60 seconds by default, about 2.5 GB).
4-4. RTMP Stream
- Start Stream starts streaming. Click again to stop (you will be asked to confirm).
- Set the destination and Stream Key under Streaming in Preferences.
- The graph below shows your streaming bitrate. Change the time range with 60s / 10m / 30m / 1h.
4-5. Camera Input
- Start Camera brings in video from a camera (such as a USB capture device). Choose the camera and microphone under Camera & Audio in Preferences.
- Landscape Mode: Each click cycles through AUTO / ON / OFF. The default is AUTO.
- AUTO: When the camera sends a portrait frame with black bars above and below (for example, an Osmo used in landscape), the center 16:9 area is cropped automatically and shown full screen. Most setups can leave this as is.
- ON: Always crops the center 16:9 area.
- OFF: Never crops.
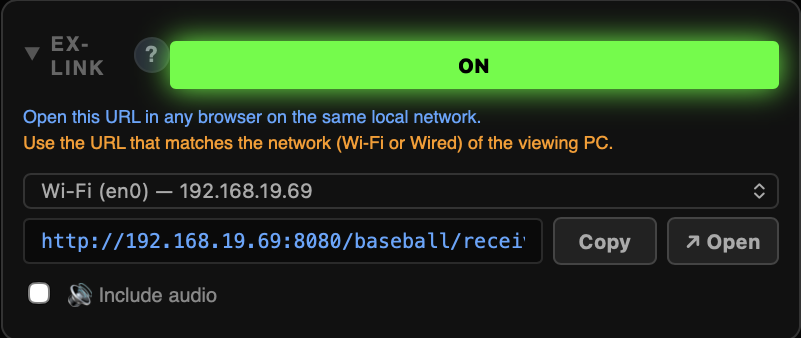
4-6. EX-LINK — send graphics to another computer, OBS or vMix
- Turn EX-LINK on with OFF / ON to get a URL that displays your graphics.
- Open the URL in any browser — even on another computer on the same network (Wi-Fi or wired).
- In OBS or vMix, add the URL as a browser source to overlay the graphics with transparency.
- Copy copies the URL and ↗ Open opens it in your browser.
- If you're on both Wi-Fi and a wired network, choose the URL for the network the receiving computer is on.
- Check 🔊 Include audio to send audio as well.
- Choose Output 2 under Output to switch to a URL that sends the Output 2 layout (10-2).
4-7. NDI® Output (PRO / STUDIO)
- OFF / ON sends the video as NDI® on the same network.
- In OBS, vMix and similar software, it appears as an NDI source named Exvast.
- On the LITE plan, the button shows PRO and cannot be used.
4-8. SDI Fill/Key (PRO / STUDIO)
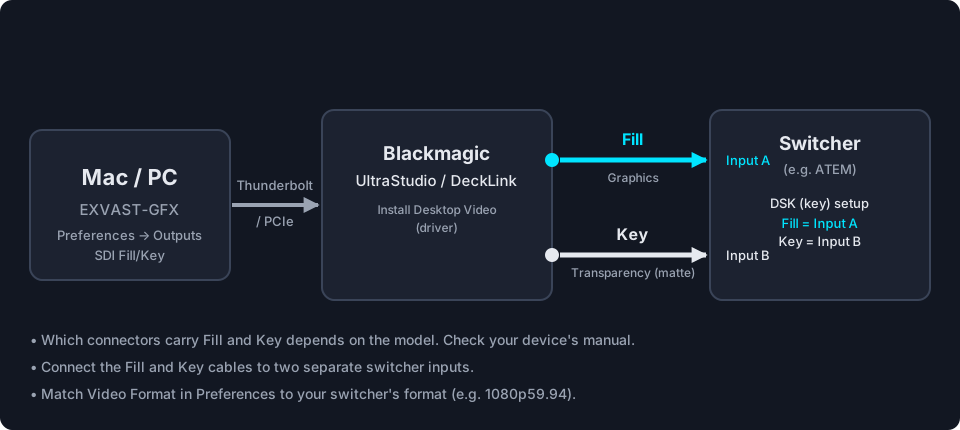
- Sends graphics from a Blackmagic device (DeckLink / UltraStudio) to a switcher as two SDI signals: Fill (the graphics themselves) and Key (the transparency matte).
- This section only shows the output status. The device, video format, which output to send (Output 1 / Output 2), and start/stop are all set under Outputs in Preferences.
- On the LITE plan, it shows PRO / STUDIO only and cannot be used.
5. Preferences
Open Preferences from the menu. There are six tabs.
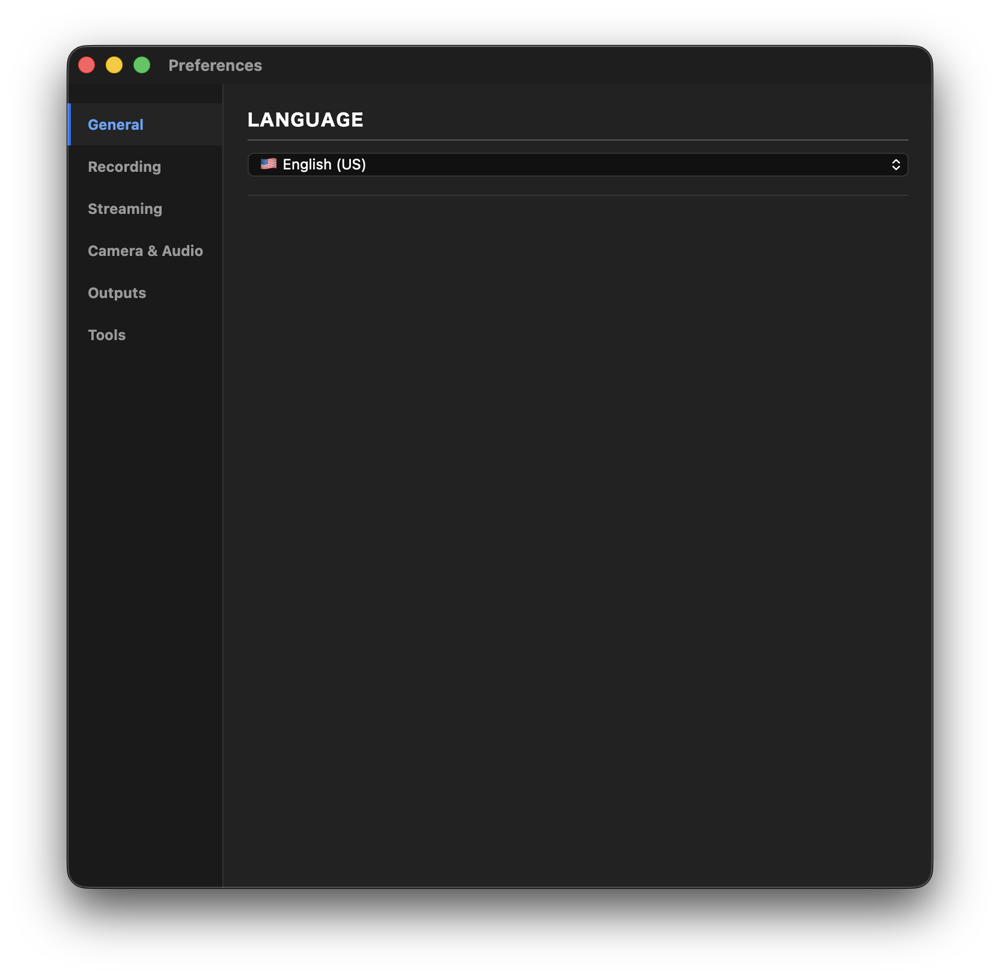
5-1. General
- Language: Choose the language of the app's screens (English (US) / English (UK) / Español / Deutsch / Français / Italiano / Português / 日本語 / 한국어).
- On first launch, it matches your Mac's language setting.
5-2. Recording
Recording Settings
| Setting | What it does |
|---|---|
| Save Path | Where recordings are saved. Click ... to choose a folder. If you don't choose one, recordings go to your Movies folder (the Videos folder on Windows) |
| Codec | H.264 (AVC) plays back on almost any device; H.265 (HEVC) gives smaller files at the same quality |
| Bitrate (Quality) | Recording quality: 10 / 15 / 25 Mbps. Higher numbers look better and make larger files |
Overlay Recording (Transparent)
- Max Duration (auto-stop): How long transparent recording (OVERLAY REC) runs before stopping automatically: 15 seconds (about 0.6 GB) / 30 seconds (about 1.2 GB) / 60 seconds (about 2.5 GB)
5-3. Streaming
| Setting | What it does |
|---|---|
| Stream URL | The streaming destination address. Click ▶ YouTube (RTMPS) / YouTube (RTMP) / Twitch / Kick / Facebook to fill it in automatically |
| Test Connection | Tests whether the destination can be reached |
| Stream Key | Enter the stream key from your streaming service's dashboard. Never share it with anyone |
| Bitrate | Streaming quality: 2.5 / 4.5 / 6.0 / 8.0 Mbps. Choose one that fits your internet upload speed |
Tip: When you save a .exv file with Save Project, you can choose whether to include the Stream Key. Leave it out when you give the file to someone else.
5-4. Camera & Audio
| Setting | What it does |
|---|---|
| Camera Input | The camera to use (such as a USB capture device) |
| Microphone Input | The microphone to use |
| NDI Source | Choose this to use NDI® video on your network as a camera. ↻ searches again |
| Capture Frame Rate | The capture frame rate. Auto (detect from device) is recommended for most cases (also 25 / 30 / 50 / 60 fps) |
- If a device you connected doesn't appear, click ↻ Refresh.
5-5. Outputs
Target Display (Receiver)
- Choose the screen that shows the graphics (such as an external display). Move Receiver to Target moves the Receiver to that screen.
Background Color (Chroma Key)
- Choose the color behind the graphics: Green (GB) (green screen), Blue (BB) (blue screen) or Transparent.
- Use CUSTOM COLOR to enter a HEX, RGB or HSB value and click Apply for any color you like.
- Use this when keying the graphics on other equipment.
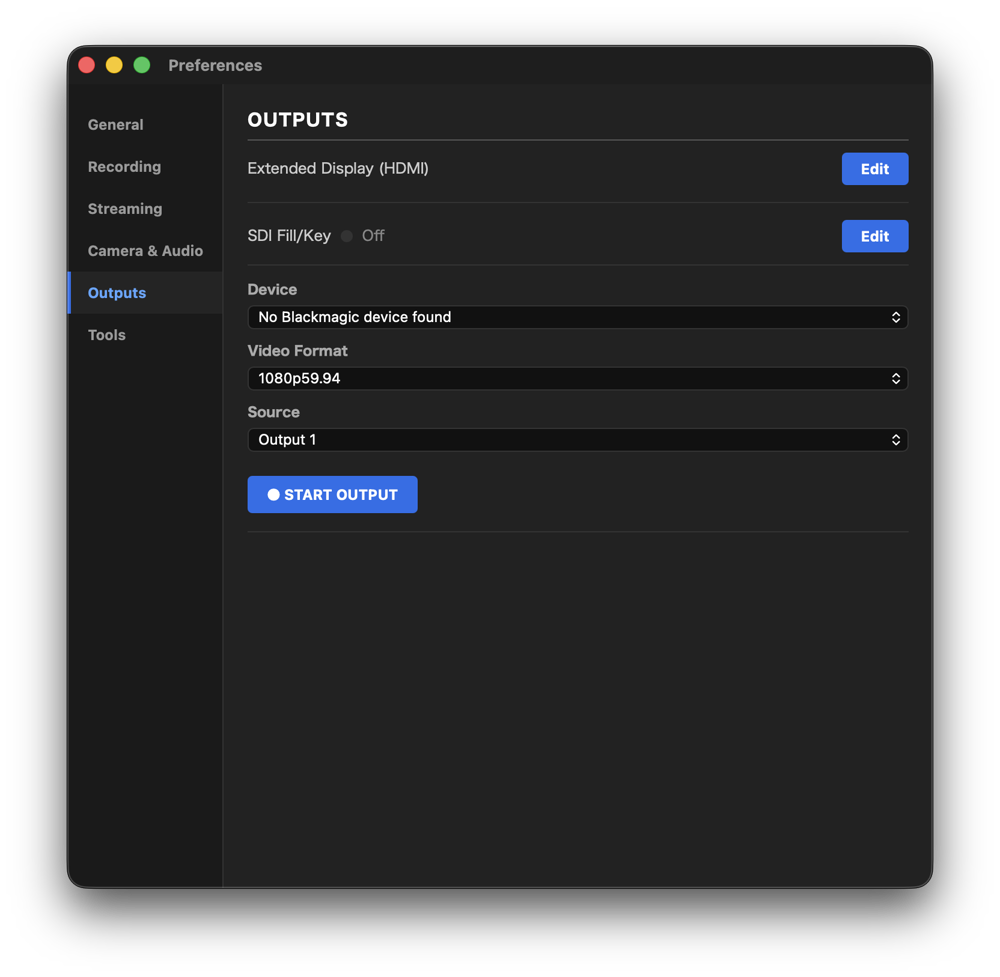
SDI Fill/Key (PRO / STUDIO)
- Click Edit on the SDI Fill/Key row to open its settings.
- Choose your Blackmagic device under Device and the video format under Video Format. Match the format to your switcher (for example 1080p59.94).
- Under Source, choose whether to send the Output 1 or Output 2 layout (10-2).
- Click ● START OUTPUT to start sending. Click again to stop.
- While sending, the row shows the device name, video format and output.
- Devices that don't support Fill/Key (External Keying) cannot be selected.
5-6. Tools
- Open Keyboard Shortcuts Config: Change the keys assigned to buttons. → 10-3. Keyboard Shortcuts
- Open Layout Editor: Change the position and size of graphics. → 10-1. Layout Editor
6. Importing from Excel and Google Sheets (PRO)
Keep your team and player data in Excel or Google Sheets, and skip retyping every player before each game.
6-1. Prepare your sheet
The easiest way is to start from the template. Download Teams & Rosters (Excel) from Official Templates on the download page, then fill in your teams and players.
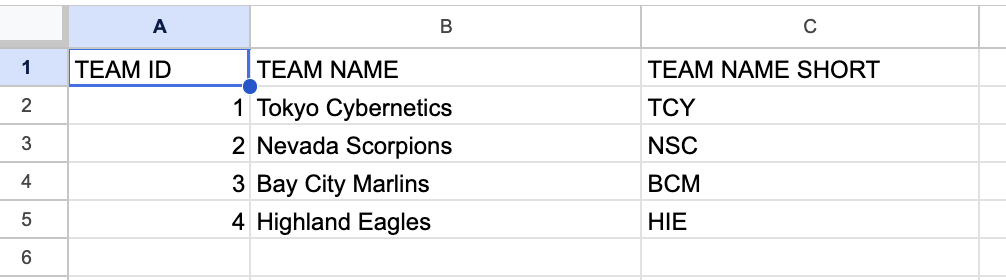
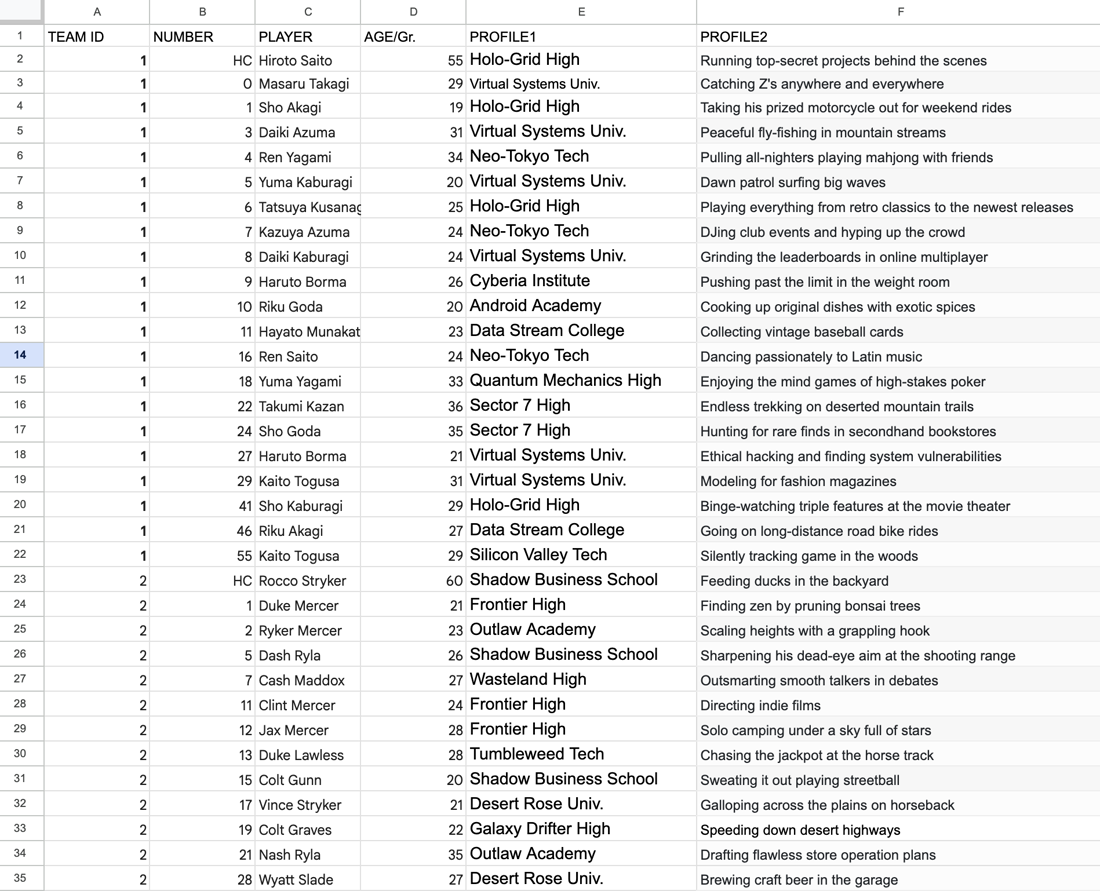
- For the head coach, enter HC in the number column.
- Row 1 is the header — start your data on row 2.
- For Google Sheets, upload the template to Google Drive. Set sharing to "Anyone with the link can view".
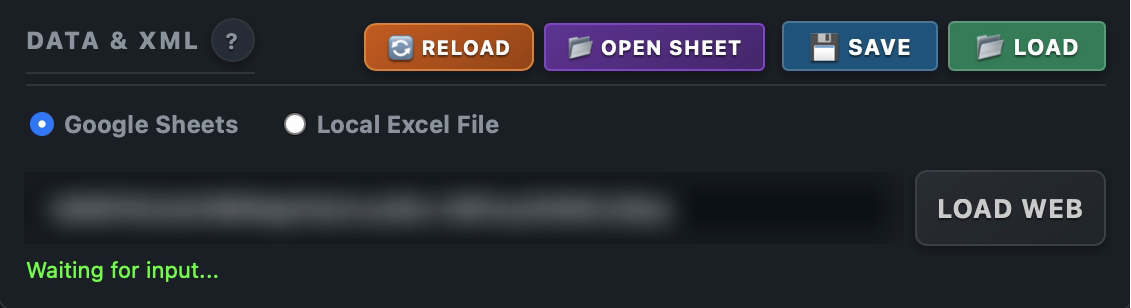
6-2. Import (Data in the Controller)
- For Google Sheets, choose Google Sheets, paste the sheet URL and click Load Web.
- For Excel, choose Excel and pick the file with Select Excel File.
- After editing the sheet, click 🔄 Reload to import it again. 📂 Open Sheet opens the original sheet.
- Click ? for an explanation of the sheet format.
6-3. Choose the teams (Team Mapping)
- From the imported teams, choose home and away (for baseball, visitor and home).
- Team names and logos are filled in, and the rosters are sent to the Formation Utility as well.
7. Studio Mode and Table Overlay (PSD, Table and Text Graphics) (PRO / STUDIO)
7-1. Studio mode
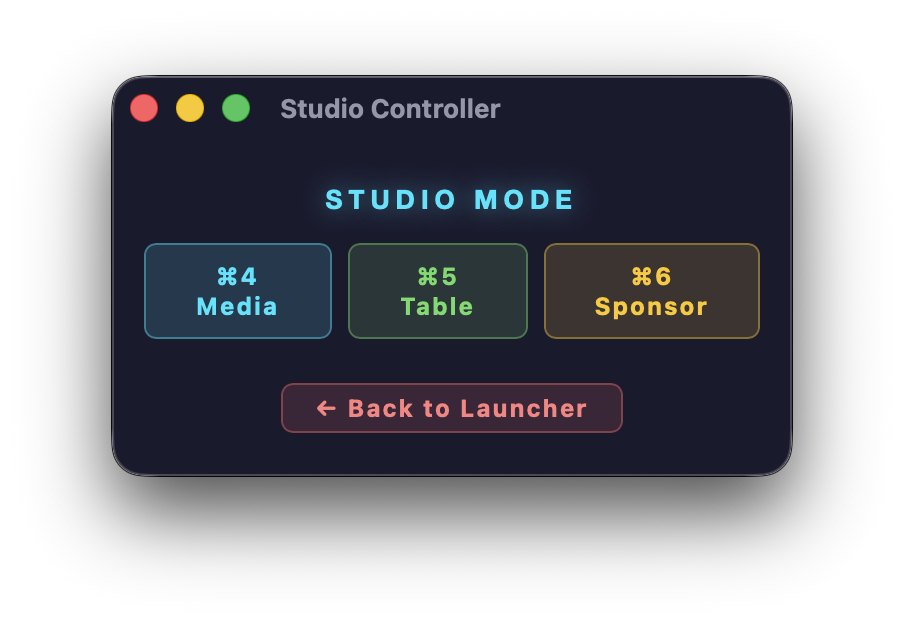
Launch Studio from the Launcher to build a show with just these three tools — no scoreboards or other sport-specific graphics:
- ⌘4 Media: Overlay videos and images (8-1)
- ⌘5 Table: Table, PSD and text graphics (this chapter)
- ⌘6 Sponsor: Show sponsors (8-2)
It's also great for sports we don't support yet, plus ceremonies, events and talk shows. When you're done, click ← Back to Launcher.
With PRO, you can also open the same screen from the Baseball or Football (Soccer) Controller with 📋 Table Overlay.
7-2. The Table Overlay screen
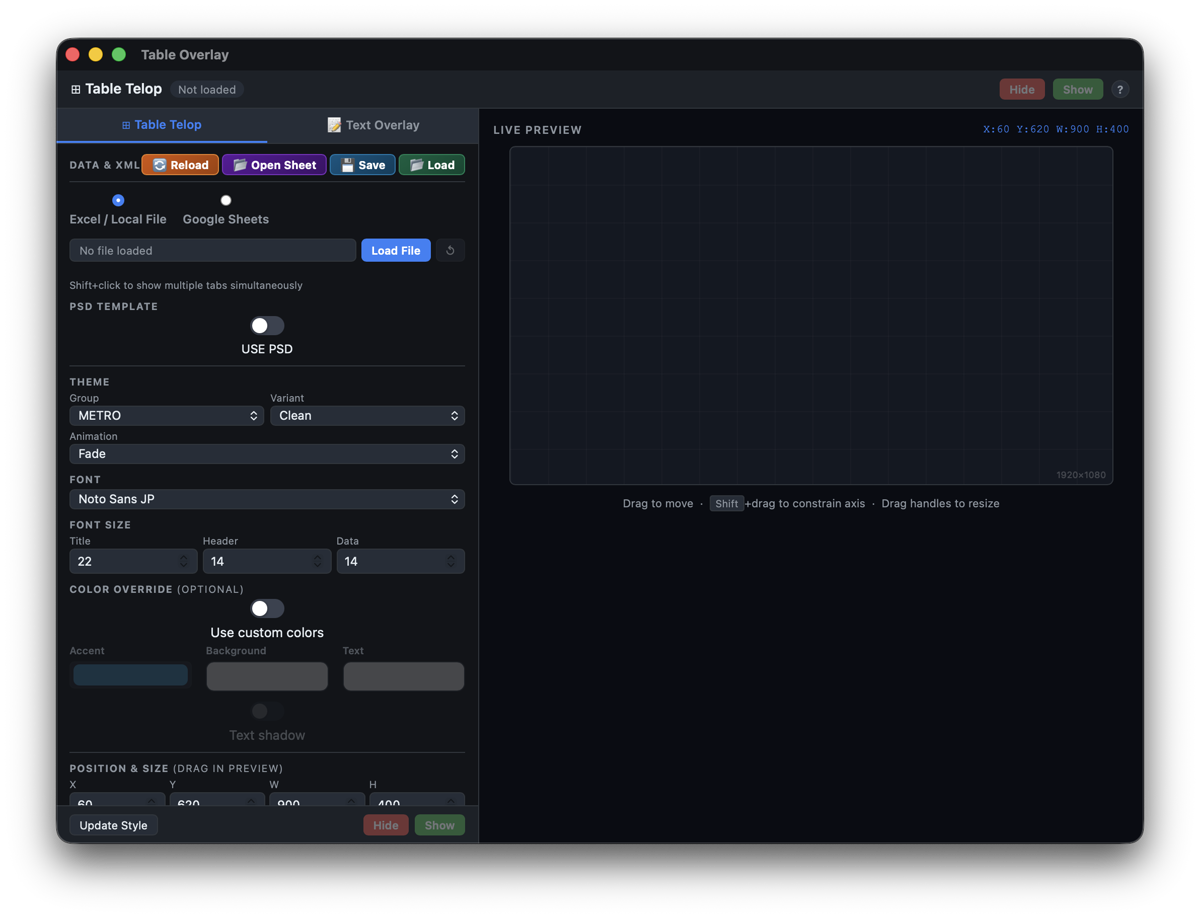
Use Show / Hide at the top of the screen to show and hide graphics. Output 1 / Output 2 to its left chooses which output's position and size you are editing (10-2). The left side has two modes:
| Mode | Use it for |
|---|---|
| ⊞ Table Telop | Turns spreadsheet tables such as standings and stats into graphics |
| 📝 Text Overlay | Turns any text into animated graphics |
7-3. Table Telop (table graphics)
Template available: Download Custom Data & Standings (Excel for standings, stats and more) from Official Templates on the download page.
Sheet format
- Row 1: Title of the whole table
- Row 2: Headers (column names)
- Row 3 onward: Data
- Don't leave blank rows in your data — the table stops at the first one.
How to load
- For Excel, click Load File. For Google Sheets, enter the URL and click Load. After editing, click ↺ to reload.
- Set Rows / page (1–20), and longer tables are split into pages automatically. Switch pages with ◀ Prev / Next ▶, or check Auto-advance to switch automatically every set number of seconds.
- Shift + click sheet tabs to show several sheets at once.
Appearance
- Choose the theme, colors, animation and font. 💾 Save to tab saves the current look to that sheet.
7-4. Use your own PSD designs
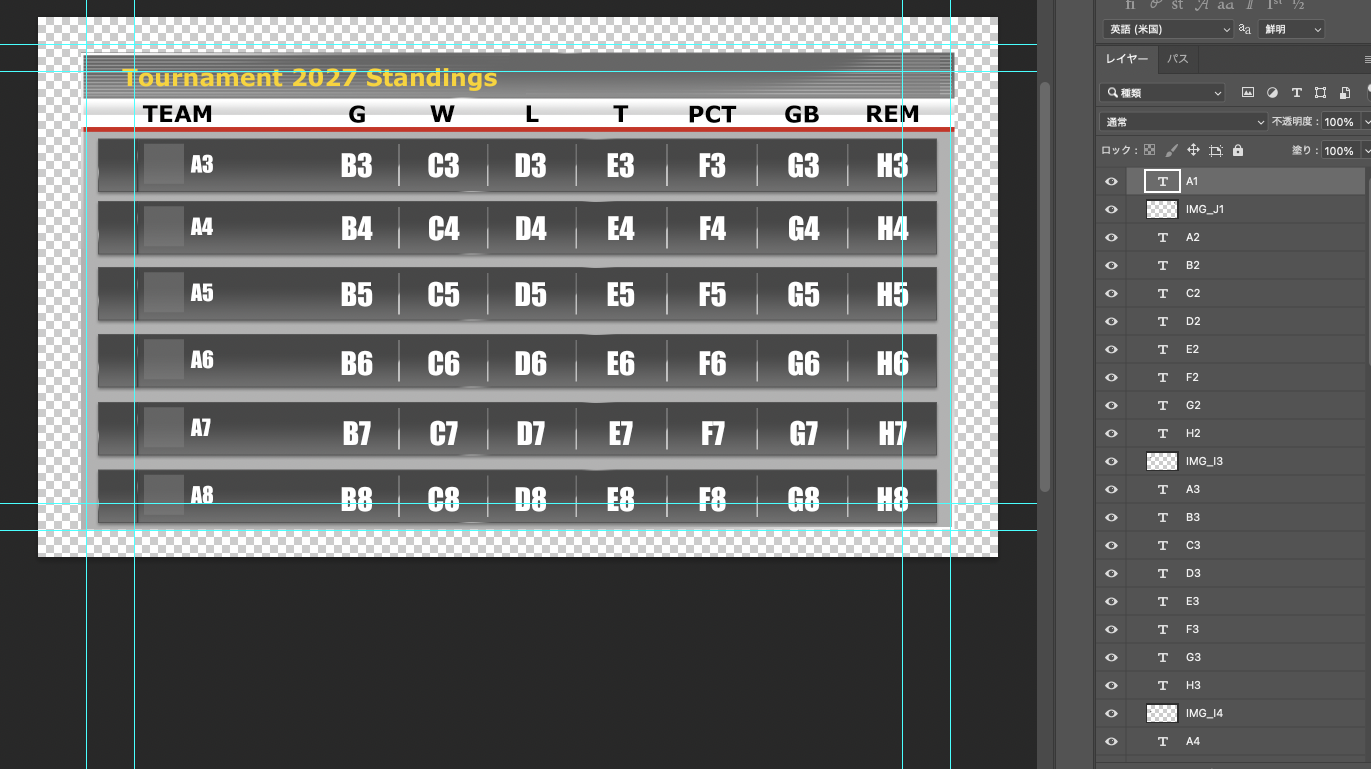
Feed text and logos from your spreadsheet straight into a design you built in Photoshop. The font, size, color and alignment of the text appear exactly as you set them in Photoshop.
Samples available: Download Baseball Standings and Football Standings (PSD, Excel and logos) from Official Templates on the download page. Open them to see how the layer names match the Excel cells.
Building the PSD
- Name each text layer after the Excel cell it should display (for example A1 or B3). The text in that cell appears there.
- For a logo or other image, add a rectangle layer and name it IMG_ plus the cell (for example IMG_I3). Put the image file name (for example comets.png) in that cell, and the image fills the rectangle without being stretched. Keep the images in the same folder as the Excel file.
- All other layers are flattened into the background image.
Building the Excel file
- Row 1 is the title, row 2 the headings, and the data starts on row 3 (the same layout as Table Telop).
- In the logo column, enter the image file names.

Loading and showing it
- Load the Excel file in Table Overlay.
- Turn on USE PSD under PSD TEMPLATE and load the file with Import PSD. Below it, you'll see the canvas size and how many layers are linked to cells (for example 1920×1080 / 64 linked layer(s)).
- Click Show. While it's on air, the button changes to Hide. Changes to position and size appear right away.
- After editing in Photoshop, click ↺ to reload. Remove a design you no longer need with Delete (you will be asked to confirm).
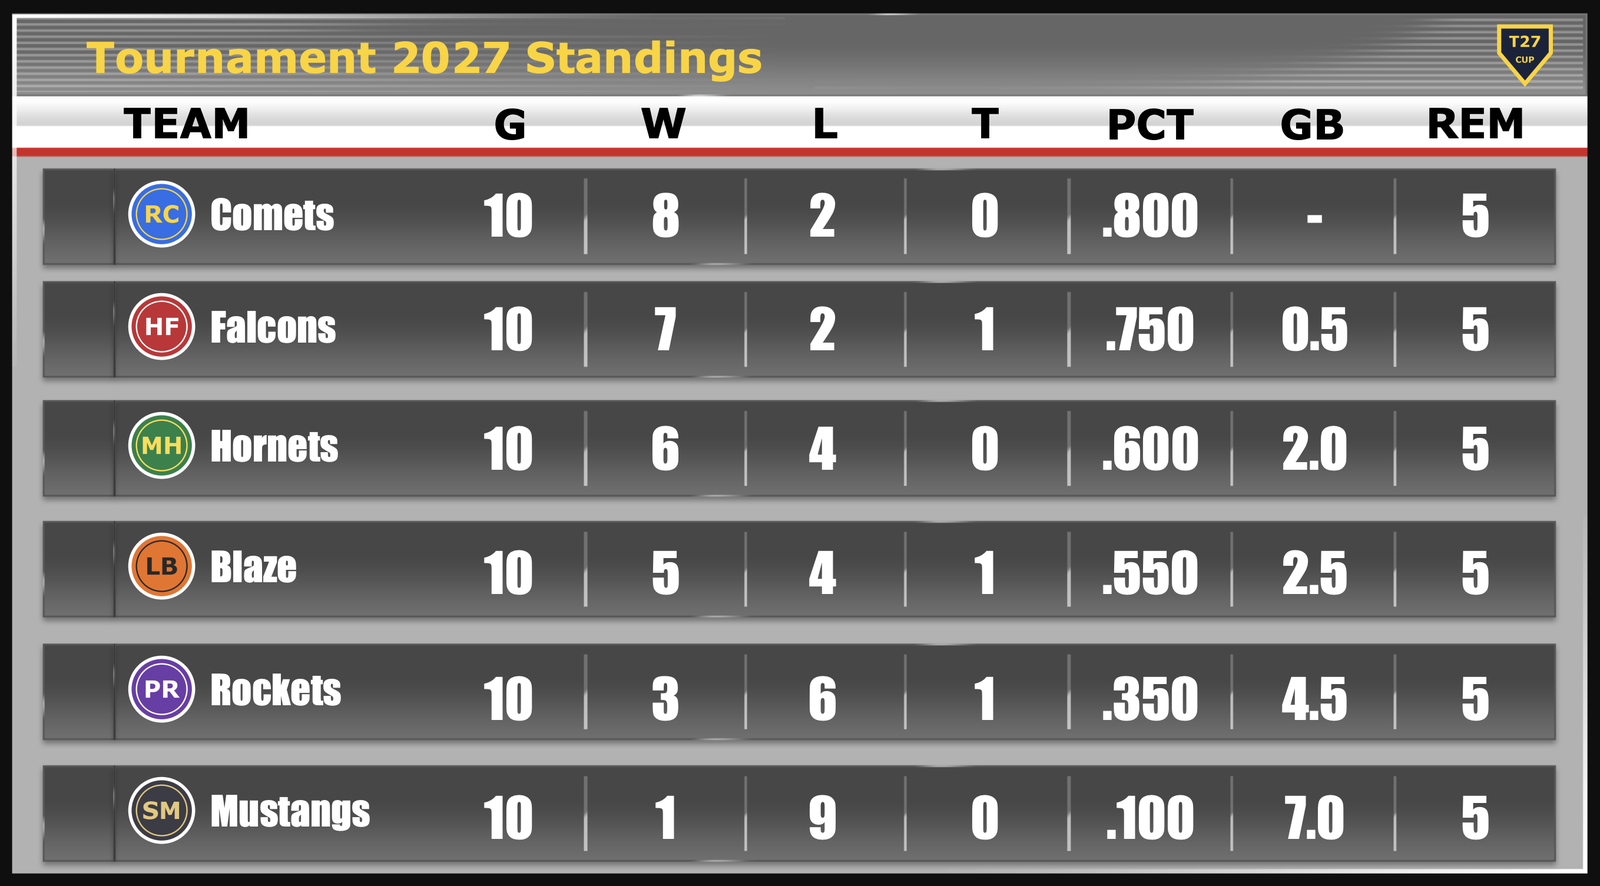
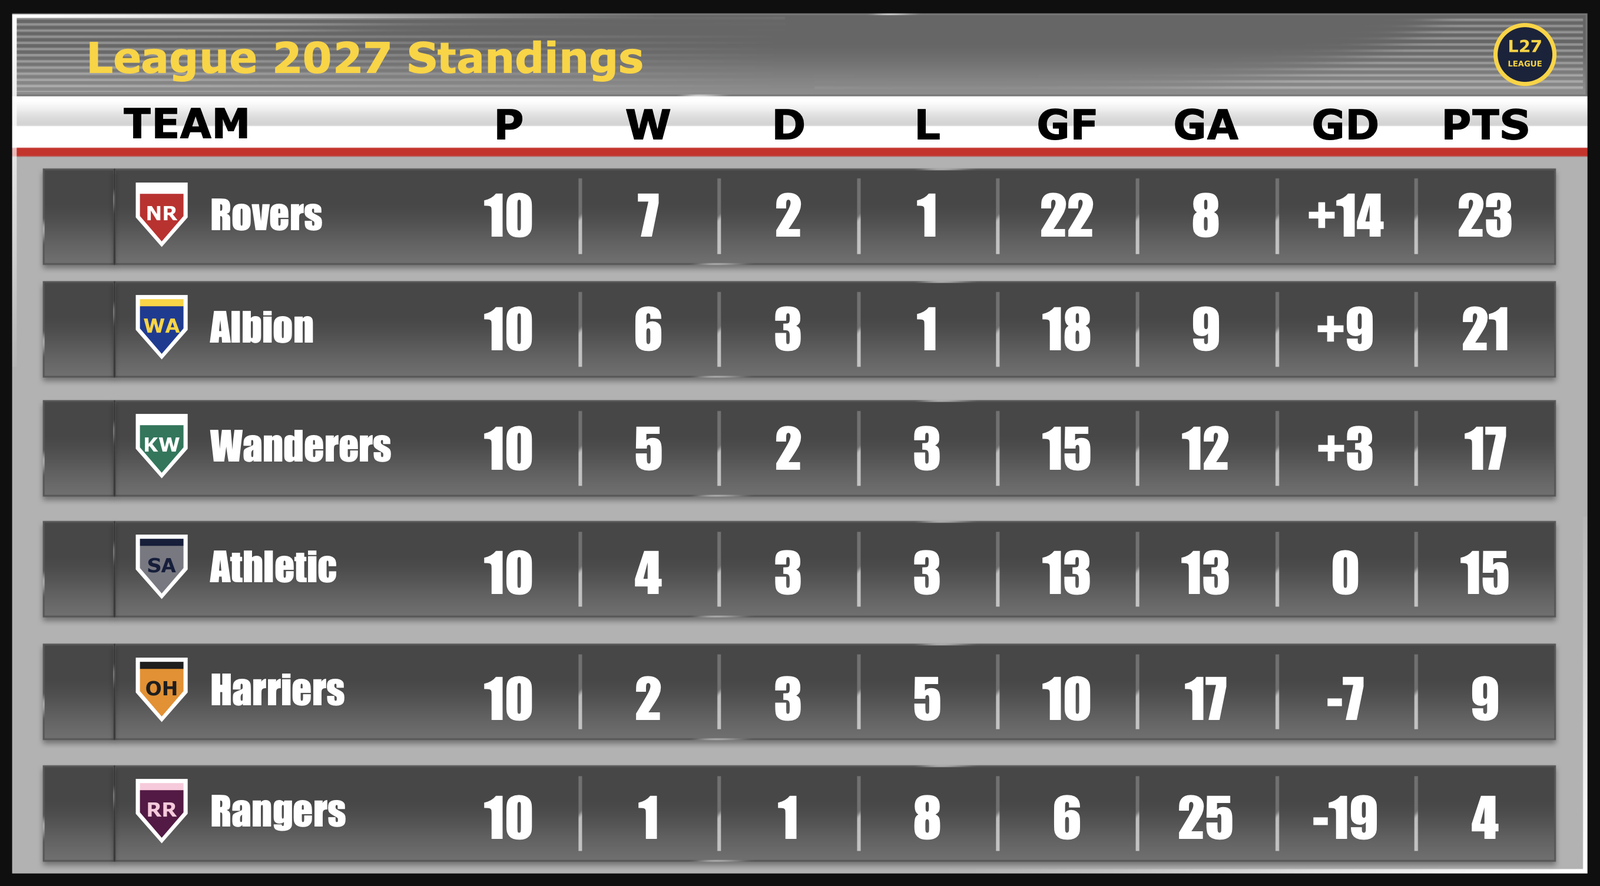
When the PSD's text style is in use, Table Overlay's own text settings (font, size, color) are turned off, and you'll see Text style (font, size, color) comes from the PSD. The fonts used in the PSD must be installed on the Mac.
When USE PSD is on, the page controls (◀ Prev / Next ▶, Rows / page, Auto-advance) are hidden. A PSD table is always a single page.
If your Excel file is in Downloads, Documents or Desktop, macOS asks for permission the first time a logo is shown. Click Allow. If logos still don't appear, go to System Settings → Privacy & Security → Files and Folders → Exvast-GFX and turn that folder on.
7-5. Text Overlay (text graphics)
- Text Slots has 100 slots for text (5 per page × 20 pages). Switch pages with ◁ / ▷.
- Type into a slot, then take it on and off air with Show / Hide.
- Select a slot to change its font, size, style, background, color and entrance animation.
- Choose the position from Top-L / Top-C / Top-R / Bot-C (top left, top center, top right, bottom center) or Ticker (text scrolling along the bottom of the screen).
- Update Style applies the look. Hide All hides all text.
- ⌘ + click slots to select several at once. You can then drag the selected slots together in the preview.
8. Media Controller and Sponsor Display (PRO / STUDIO)
8-1. Media Controller (overlay videos and images)
Open it with ⌘4 Media in the menu (from the Baseball Controller, you can also use 📂 Media Controller).
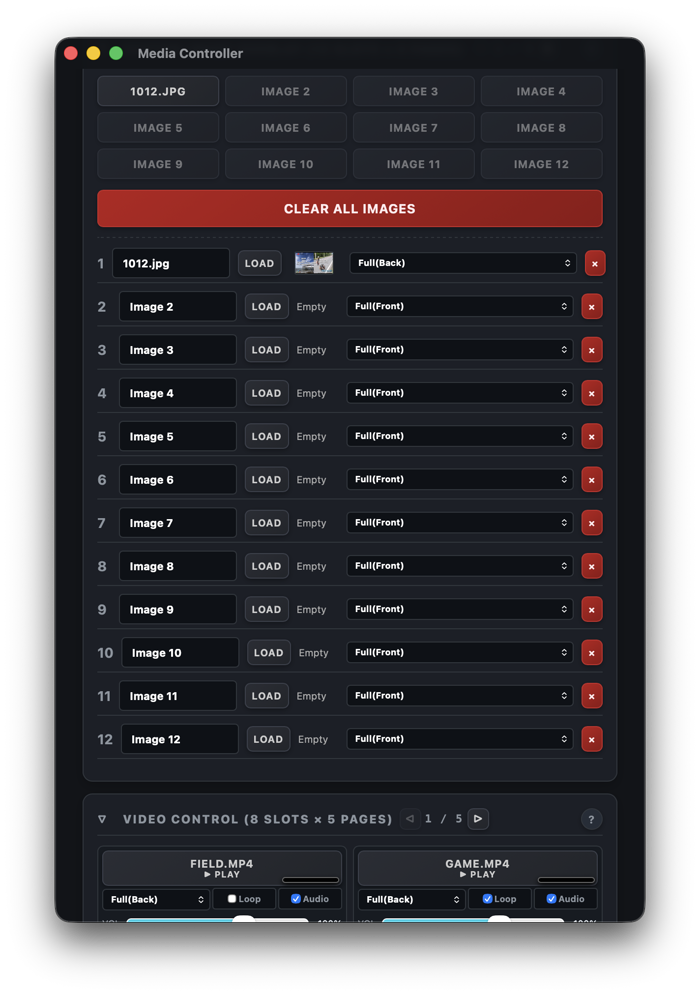
Custom Image Overlay (images: 12 slots × 5 pages)
- Load images into slots and take them on and off air with a click — great for logos, announcements and still graphics.
- Switch pages with ◁ / ▷.
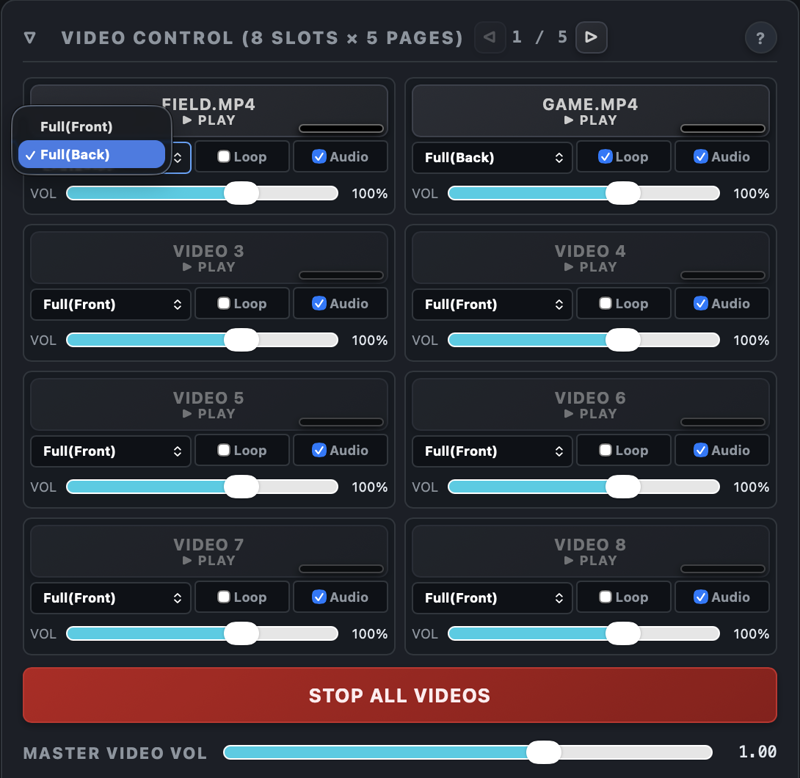
Video Control (videos: 8 slots × 5 pages)
- Load videos into slots and play or stop them — perfect for replays, openers and ads.
- STOP ALL VIDEOS stops every video, and Master Video Vol sets the overall video volume.
Display mode (images and videos)
| Mode | When to use it |
|---|---|
| Full(Front) | Plays in front of the graphics. Ideal for openers and full-screen announcements |
| Full(Back) | Plays behind the graphics. Use it to roll recorded game footage under the scoreboard and player intros (9-1) |
- You can switch between Full(Front) and Full(Back) even during playback.
Change position and size (Edit)
- Click Edit on any image or video slot to open a preview.
- Drag to move, and drag a corner to resize. Hold Shift while dragging to move only horizontally or vertically. You can also type values into X / Y / Scale (%).
- Output 1 / Output 2 at the top right chooses which output's position and size you are editing (10-2).
- Reset restores the defaults, and Done closes the preview.
8-2. Sponsor Display
Open it with ⌘6 Sponsor in the menu (from the Baseball Controller, you can also use 🎯 Sponsor Display).
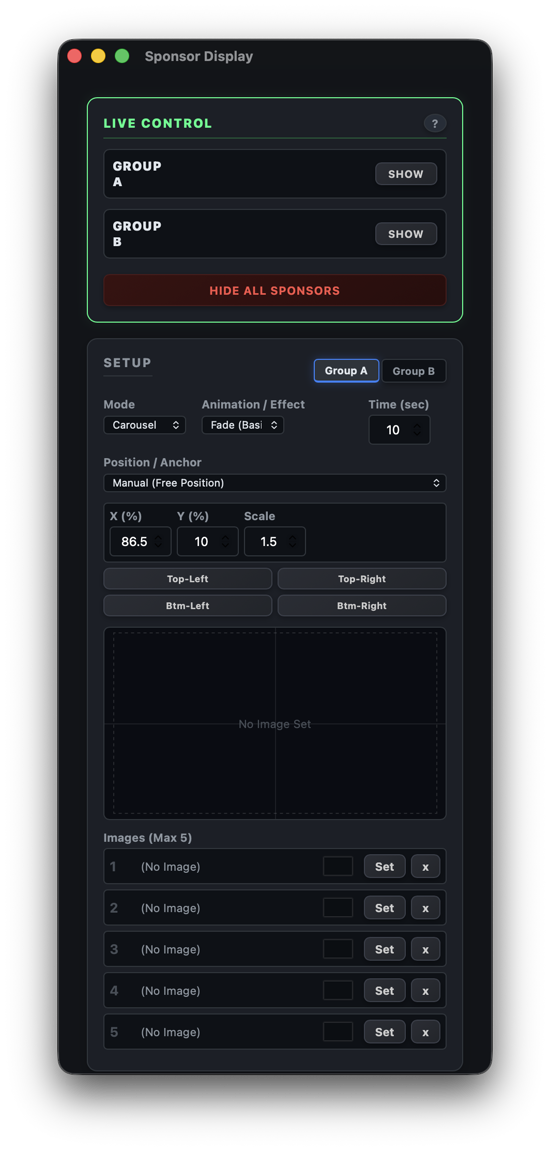
SETUP
- Sponsors can be registered in two groups, Group A and Group B, with up to 5 images each.
-
Mode (how they are shown)
Mode How it shows Carousel Rotates through several logos in turn Banner Displays them as a banner strip Manual (Free Position) Shows them wherever you like (set X / Y (%) and Scale, or choose Top-Left / Top-Right / Btm-Left / Btm-Right) Link: Baseball BSO / FULL SCORE / MINI SCORE Attaches them to the baseball count display or line score -
Animation / Effect sets the motion, Time (sec) the number of seconds between changes, and Position / Anchor the reference position for display.
- Output 1 / Output 2 at the top of the screen chooses which output's position and size you are editing (10-2).
LIVE CONTROL
- SHOW: Shows or hides the Group A and Group B sponsors individually.
- HIDE ALL SPONSORS: Clears every sponsor from the screen.
9. Examples
9-1. Add graphics to your game footage and export an MP4
Add graphics to camcorder or phone footage — no editing software required.
- Load your game video into a slot under Video Control in Media Controller.
- Set the display mode to Full(Back) (behind the graphics).
- Click ● REC START in Output Manager, then play the video.
- As the footage plays, fire the scoreboard, goals, player intros and more from the Controller.
- When you're done, click ● REC START again to stop. Your MP4, graphics and all, is ready.
- The video's audio is recorded too (if a camera is running, its microphone audio is mixed in).
9-2. Overlay graphics on footage in an editing app
For finishing in Premiere Pro or DaVinci Resolve.
Short moments (goals, player intros, etc.)
- Use ● OVERLAY REC to record only the graphics with a transparent background (ProRes 4444 MOV).
- Put it on a track above your footage and it composites automatically.
- These files are very large, so recording stops automatically after 60 seconds at most.
A whole game
- Set the background to Green (GB) under Outputs in Preferences, and record an MP4 with ● REC START.
- Key out the green in your editor and place it over the original footage, lined up in time.
9-3. Bring graphics into OBS or vMix with EX-LINK (works from another computer too)
- Turn EX-LINK ON in Output Manager and Copy the URL that appears.
- In OBS, click + under Sources, choose Browser, paste the URL, and set the width to 1920 and height to 1080.
- In vMix, choose Web Browser from Add Input and paste the URL.
- Your graphics appear over the camera feed with full transparency.
- It also works with OBS or vMix on another computer. Connect it to the same network (Wi-Fi or wired) as the computer running EXVAST-GFX.
- If nothing appears, make sure you chose the URL for the network the receiving computer is on in Output Manager.
9-4. Send to OBS or vMix with NDI® (PRO / STUDIO)
- Turn NDI Output ON in Output Manager.
- In vMix, choose NDI from Add Input, then choose Exvast.
- In OBS, install the NDI plugin for OBS (DistroAV), then choose Exvast in NDI Source.
- Your graphics appear with full transparency.
- You can also send to other computers on the same network. A wired connection is recommended.
9-5. Send to a Blackmagic switcher with SDI Fill & Key (PRO / STUDIO)
What you need
- A Blackmagic DeckLink or UltraStudio (one that can output two SDI signals, Fill and Key)
- Blackmagic Desktop Video (driver), version 16 or later (with older versions, the device shows up as Unknown and can't be selected)
Steps
- Connect the device and install Desktop Video.
- Allow Desktop Video to run on your Mac (without this, the device won't be detected).
- Open System Settings → General → Login Items & Extensions.
- Under App Background Activity, turn on Blackmagic Desktop Video.
- Under Extensions, click ⓘ next to Camera Extensions and Drivers, and turn on every Blackmagic item (with Desktop Video 16, there are three under Drivers).
- If Privacy & Security asks for permission, click Allow and restart your Mac.
- Open Blackmagic Desktop Video Setup. If your device appears there, you're ready.
- If Exvast was already open when you installed or allowed Desktop Video, quit Exvast and open it again.
- Click Edit on SDI Fill/Key under Outputs in Preferences, and choose the Device and Video Format. Match the Video Format to your switcher (for example 1080p59.94).
- Click ● START OUTPUT.
- On the switcher, set up a downstream key (DSK) or similar using the Fill and Key inputs. On an ATEM, turn on Pre Multiplied Key in the key settings.
10. Make It Your Own
10-1. Layout Editor (change graphic position and size)
Drag the scoreboard, player intros and other graphics to exactly where you want them, at exactly the size you want.
To open: Preferences (⌘,) in the menu → Tools → Open Layout Editor
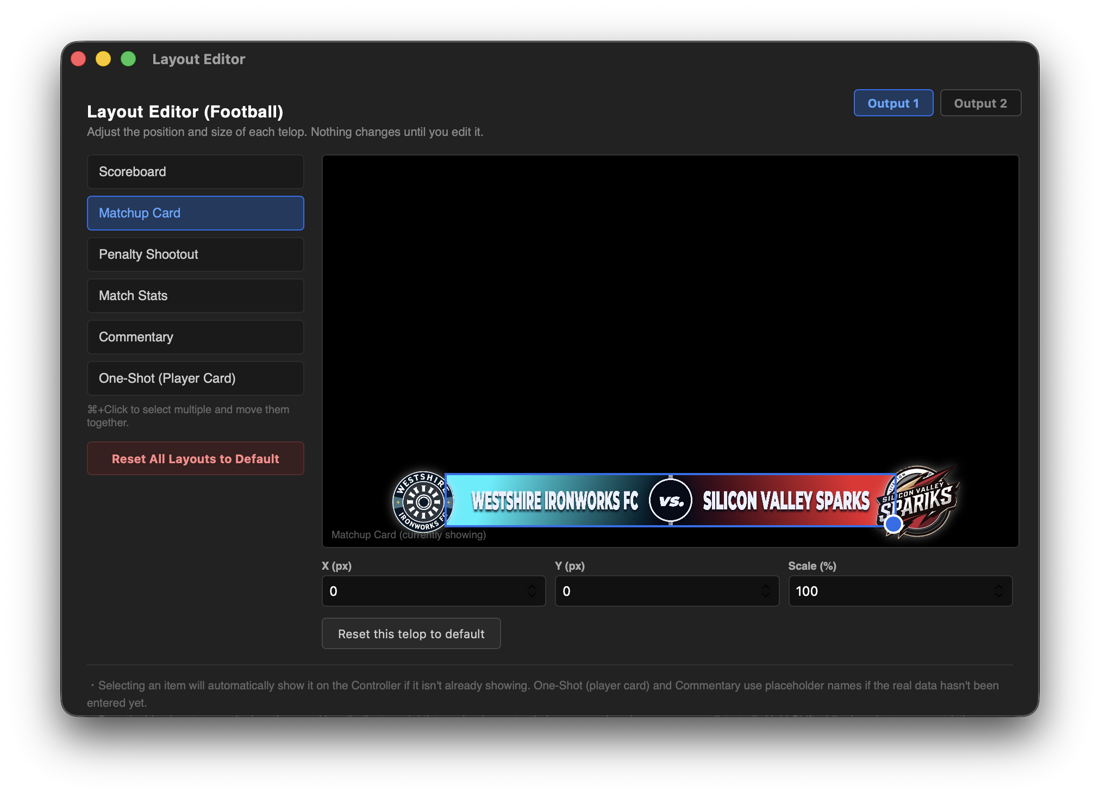
How to use
- Select a graphic from the list on the left. If it isn't on air, it appears automatically. Player cards and commentator graphics show placeholder names until you enter real ones.
- Drag the blue frame in the preview to move it, and drag the round handle at the bottom right to resize it. The aspect ratio is kept, so logos are never distorted.
- Hold Shift while dragging to move only horizontally or vertically. You can also type values into X / Y (pixels) and Scale (%).
- ⌘ + click graphics in the list to select several and move them together.
- Graphics you have changed are marked ● Changed in the list.
- Changes save automatically and show up instantly on the Receiver, EX-LINK and OBS.
- Reset this telop to default restores the selected graphic, and Reset All Layouts to Default restores every graphic, to its original position and size (you will be asked to confirm).
Graphics you can move
| Sport | Graphics |
|---|---|
| Baseball | Scoreboard (BSO), Running Score, Mini Score, Big Score / Final Result, Matchup Card, Lineup (both teams / one team), Defense Formation (large / small), Bench, One-Shot (Player Card), Commentary |
| Football (Soccer) | Scoreboard, Matchup Card, Penalty Shootout, Match Stats, Commentary, One-Shot (Player Card) |
- In Baseball, BSO, Running Score, Mini Score and Big Score can each be moved separately.
- The "both teams" and "one team" Lineup graphics share the same frame, so they move together.
10-2. Output 1 / Output 2 (a different layout per destination)
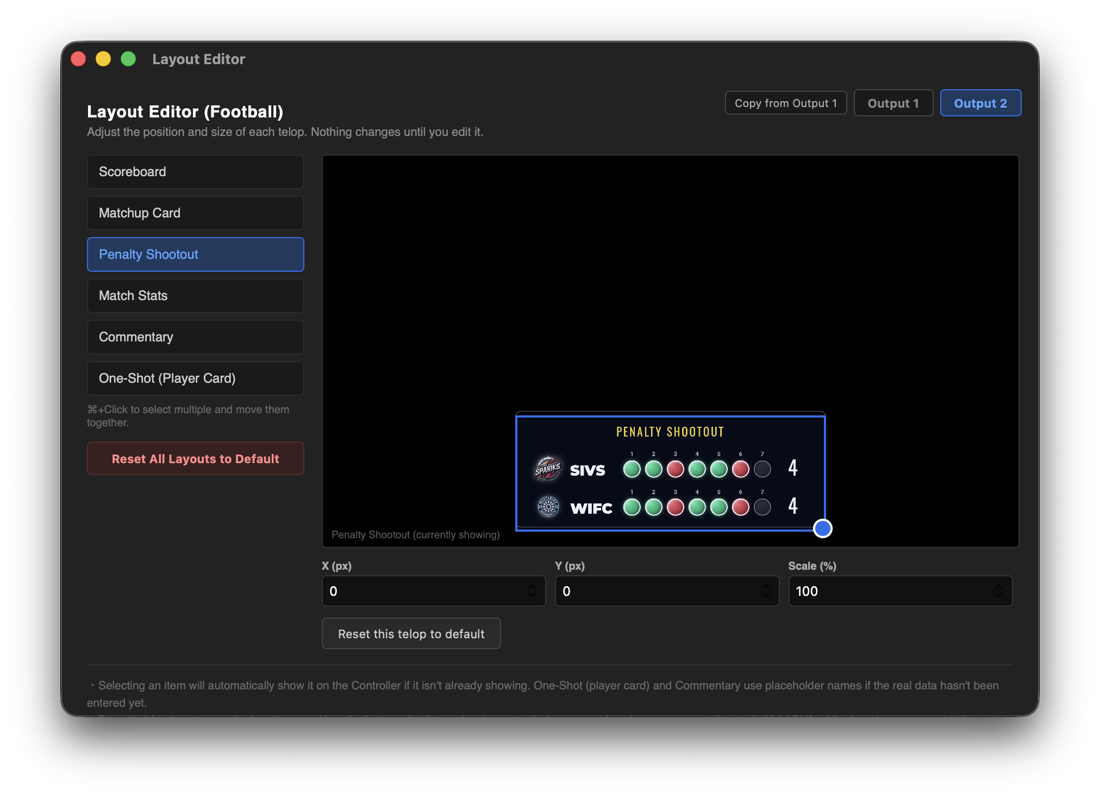
You can keep two sets of graphic positions and sizes: Output 1 and Output 2. Scores, player names and other content stay in sync; only placement and size differ.
Destinations that can use Output 2
| Destination | How to choose |
|---|---|
| EX-LINK | Choose Output 2 under Output in EX-LINK in Output Manager, and use that URL (4-6) |
| SDI Fill & Key | Set Source to Output 2 under Outputs in Preferences (5-5) |
- The preview, recording, streaming, NDI® and external display always use Output 1.
- Don't need Output 2? Just ignore it — everything runs on Output 1.
Setting Output 2 positions and sizes On each screen, use the Output 1 / Output 2 buttons (usually at the top right) to choose which output you're editing, then adjust.
| Screen | What you can change |
|---|---|
| Layout Editor | The scoreboard, player intros and more (10-1). Choosing Output 2 shows Copy from Output 1, which copies all Output 1 positions |
| Table Overlay | Position and size of Table Telop and Text Overlay (7-2) |
| Media Controller | Position and size of each image and video slot, via Edit (8-1) |
| Sponsor Display | Sponsor position and size (8-2). When sponsors are attached to another graphic (such as Link: Baseball BSO), Output 1 and Output 2 use the same position |
- In the Layout Editor, Output 2 starts from the default positions. To start from the Output 1 positions, use Copy from Output 1.
- In Table Overlay, Media Controller and Sponsor Display, Output 2 uses the same positions as Output 1 until you change them.
10-3. Keyboard Shortcuts (assign keys to buttons)
Map keyboard keys to the buttons you use most. Pair them with a controller that sends keystrokes, like a Stream Deck, for one-press control of your graphics.
To open: Preferences (⌘,) in the menu → Tools → Open Keyboard Shortcuts Config
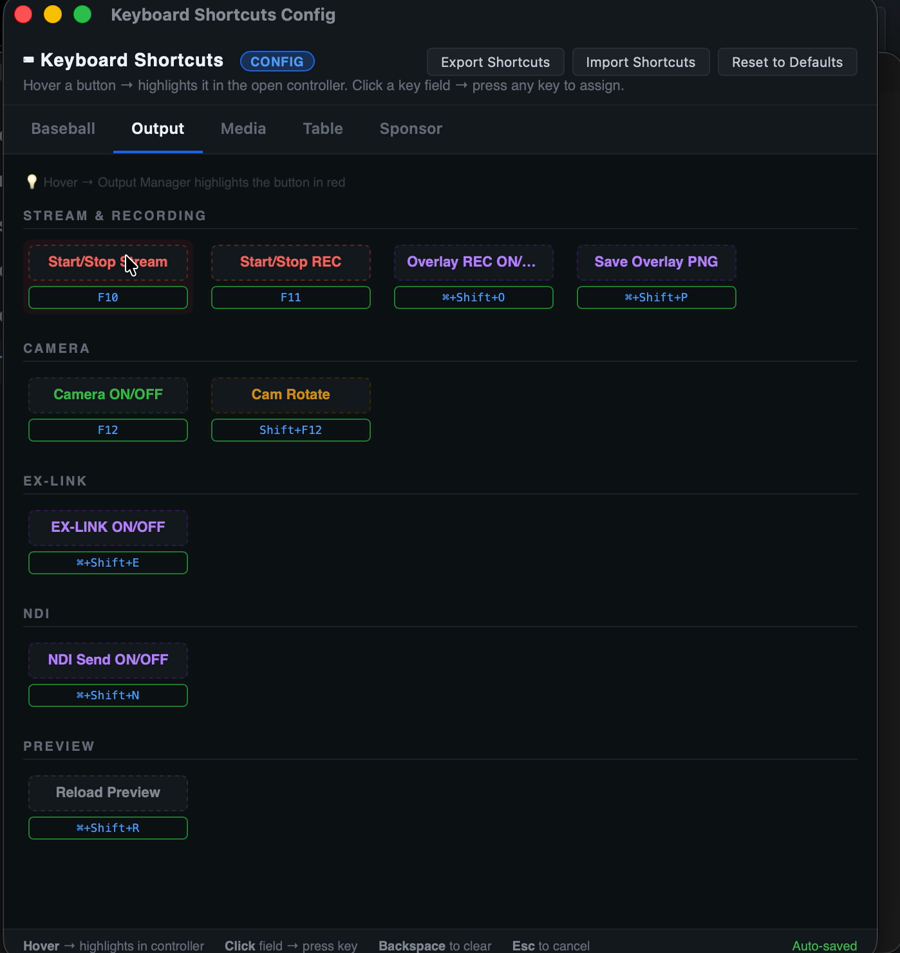
A red marker shows which button you're setting Hover over any item in Keyboard Shortcuts and a red marker lights up the matching button on the control screen — scrolling it into view if needed. No more guessing which button is which.
- The red marker appears when the relevant control screen (Controller, Output Manager, Media Controller, Table Overlay or Sponsor Display) is open.
Assigning a key
- Choose a tab at the top (Baseball / Football / Output / Media / Table / Sponsor). Only the tab for the sport you're running appears.
- Click an item's field and press the key you want. Modifiers (⌘, Ctrl, Alt, Shift) are supported.
- Changes save automatically.
- Esc cancels, and Delete (Backspace) clears the item's key.
- ⌘ + click a field to restore just that item's default key.
- If you press a key that's already taken, you'll see which item uses it, along with a free key to use instead. Use suggestion switches to the suggested key.
- Reset to Defaults restores every item's default key (you will be asked to confirm).
- Export Shortcuts / Import Shortcuts save your settings to a file and load them again — handy for setting up another computer the same way.
- On the LITE plan, items for PRO features are not shown.
When keys work
- Baseball and Football keys work whichever EXVAST-GFX window is in front.
- Output, Media, Table and Sponsor keys work when that screen is in front.
- They don't fire while you're typing in a text field.
- They don't work when another app, such as OBS, is in front.
One-button control with a Stream Deck and similar devices With a controller that sends keystrokes, such as Elgato's Stream Deck, you can take graphics on and off air, update the score, start recording or streaming and more with a single press. No more hunting for tiny buttons with the mouse mid-show.
- In EXVAST-GFX's Keyboard Shortcuts, assign a key to the button you want to control (see "Assigning a key" above).
- In the Stream Deck app, drag Hotkey from System onto the button you want to use.
- Click the Hotkey field and press the same key you assigned in step 1.
- With an EXVAST-GFX window in front, press the Stream Deck button.
- Keys sent by the Stream Deck go to the app in front. If OBS or another app is in front, they won't reach EXVAST-GFX.
- Function keys such as F10 and F11, or combinations like ⌘ + Shift + a letter, are less likely to clash with normal keyboard use (the keys preassigned on the Output tab follow this pattern).
- Any device that can send keystrokes works the same way.
11. Troubleshooting
| Problem | What to check |
|---|---|
| The preview, recordings or streams are black | Check that Exvast-GFX is turned on under Screen Recording, then reopen the app. 👉 Open Screen Recording settings |
| Only the preview freezes or goes black | Click ⟳ Reload Preview in Output Manager |
| Can't record ("Recording folder not found") | Check that the save folder exists under Recording in Preferences |
| Recording won't start (a free space warning appears) | Make sure there is at least 5 GB free at the save location |
| Can't stream ("Stream Key not set") | Enter your Stream Key under Streaming in Preferences. Use Test Connection to check the connection |
| A camera or microphone doesn't appear | Click ↻ Refresh under Camera & Audio in Preferences. If it still doesn't appear, check that Exvast-GFX is allowed for the camera and microphone. 👉 Open Camera settings / Open Microphone settings |
| A Google Sheet won't load | Check that sharing is set to "Anyone with the link can view" |
| EX-LINK doesn't appear on another computer | Check that both are on the same network and that you have chosen the URL for the right network in Output Manager |
| The NDI or Fill & Key button shows "PRO" | These aren't available on the LITE plan. Use the PRO or STUDIO plan |
| I was signed out unexpectedly | Each account works on up to 2 computers. Signing in on a third signs out the one with the oldest sign-in |
| The app stopped working after using it offline | After 7 days without an internet connection, your sign-in needs to be verified. Connect to the internet and reopen the app |
| Recording or streaming stops during the free trial | In the free trial, recording stops after 10 minutes and streaming after 5 minutes |
About the firewall On a Mac, you usually won't see a firewall prompt, because macOS allows signed apps by default. If EX-LINK or NDI can't be seen from another computer, check that Exvast-GFX isn't blocked by the firewall.
👉 Open Network settings (then choose Firewall)
The 👉 links only work on a Mac. When your browser asks whether to open System Settings, click Allow.